JWT Assertions
What is a JWT assertion?
A JWT assertion is a security token used to make verifiable claims about a subject. It is cryptographically signed to ensure authenticity and integrity.
Why should you care?
JWT assertions play a critical role in the process of obtaining a three-legged access token for a server-to-server application.
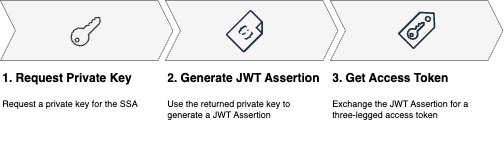
Once you have an SSA (Secure Service Account) for a server-to-server application:
- Request a private key for the SSA using the Create Key operation.
- Use the returned private key to generate a JWT assertion for that SSA. This procedure is described in the section Generating JWT assertions below.
- Use the Exchange JWT Assertion for Token operation to exchange the generated JWT assertion for a three-legged access token. This access token provides secure access to the resources the server-to-server application needs to access.
Generating JWT assertions
To generate a JWT assertion, you need to sign a combination of headers and claims. You will use a private key that you obtained for the SSA to perform this signing. Each header and claim serve a unique purpose as listed below:
Headers:
kid(Key ID): The private key ID returned by the Create Key operation.alg(Algorithm): The signing algorithm used to sign the assertion. For this flow, it will always beRS256.
Claims:
iss(Issuer): Client ID of the application generating the assertion.Example:
JlO9TA1zjfJQOGXpJmq9JHJSI0D4UkQ4sub(Subject): Service Account ID of the SSA that owns the key.Example:
Z752CT5MKW2S9N7Eaud(Audience): Always set to https://developer.api.autodesk.com/authentication/v2/token.exp(Expiration): Time (in Epoch) when the assertion expires. Must be 0-5 minutes in the future.Example:
1710907100scope: Requested scopes as an array of strings.Example:
["user:read", "data:read"]
Manual generation (for testing):
- Open https://jwt.io/
Note: These instructions are based on the jwt.io interface as of August 20, 2025. Since web interfaces can change without prior notice, some steps or element locations may differ from what’s currently documented. If you encounter discrepancies, look for similar functionality or refer to the site’s updated documentation. The core concepts and workflow described here should remain applicable even if the specific interface elements change.
- In the JWT Decoder tab, paste the example assertion shown below, in the ENCODED VALUE box. The
headers and the claims are displayed in the DECODED HEADER and DECODED PAYLOAD boxes.
eyJhbGciOiJSUzI1NiIsInR5cCI6IkpXVCIsImtpZCI6InlvdXItcHJpdmF0ZS1rZXktaWQifQ.eyJpc3MiOiJ5b3VyLWNsaWVudC1pZCIsInN1YiI6InlvdXItc2VydmljZS1hY2NvdW50LWlkIiwiYXVkIjoiaHR0cHM6Ly9kZXZlbG9wZXIuYXBpLmF1dG9kZXNrLmNvbS9hdXRoZW50aWNhdGlvbi92Mi90b2tlbiIsImV4cCI6MTc1NTY1NjAwMywic2NvcGUiOlsiZGF0YTpyZWFkIiwiZGF0YTp3cml0ZSJdLCJpYXQiOjE3NTU2NTU3MDN9.cfwhxD3wE98DD4ROQE3sVKExU2W4BJr5Ci9o-5lmZ6N4qVhm-7plLtr1-XpEG4D4XTBxczB3wmG31nfq3E7C1PQTdWB-RKzU0YSxdHYloLqSBMcUlhumCS-CkieJxvcaWdYI8vgfmK-G0NCkyTyt4qWZulhkO4-3BbzhOxK8qlGQ2GW8di1A792WOjz81yj7LVtVo-g555Ujk50scmeaRNjlZ4sR6qpJFbweFzvQn6rQ8Hj7fcXL0aUd0pCJ5404L84wS69JbCytKEwN7xcymJAo52_T_scouR1i2ofBWXPUxXkuTH4eNeWXI9tD8tmxv-Q_I86k3EN0Apye98RB3Q - In the JWT Encoder tab, in the area reserved in the HEADER box, enter the following details:
- kid: your-private-key-id
- In the PAYLOAD: DATA box, enter the following details:
- iss: your-client-id
- sub: your-service-account-id
- Paste your private key in the area reserved for the private key, within the
SIGN JWT box.
Note: If your private key still contains
\n, you must replace it with newlines.Tip: In Terminal, execute the following command to convert all\ninto actual newline characters.echo -e "<your_private_key>"The JWT assertion is displayed in the JSON WEB TOKEN box.
Programmatic generation:
For programmatic generation, you can use JWT libraries available in various programming languages. The implementation requires:
- Required libraries and installation:
- JavaScript:
jsonwebtokennpm package (npm install jsonwebtoken) - C#:
System.IdentityModel.Tokens.JwtNuGet package - Python:
PyJWTpip package (pip install PyJWT) - Go:
github.com/golang-jwt/jwt/v4module
- JavaScript:
- Implementation guidelines:
- Use the RS256 algorithm for signing
- Include the
kid(Key ID) in the JWT header - Set the
exp(expiration) to 0-5 minutes from the current time - Format the
scopeclaim as an array of strings, not a single string - Use the private key obtained from the Create Key operation
- Token structure:
Your JWT should include all the headers and claims defined in the sections above, with the payload properly signed using your private key.
Complete working examples:
For complete, ready-to-run code examples that demonstrate JWT assertion generation and token exchange, see the Get Started with SSA walkthrough.
Frequently asked questions
- I lost my private key, what should I do?
If your private key is lost or is compromised, generate a new key using the Create Key operation.
- Is there a way to identify whether an access token is generated using this flow?
Yes. You can determine if an access token was generated using the service account flow by checking its ID claim (jti).
Access tokens created through service accounts will have a distinctive “SA-” prefix in their ID claim.
- The Exchange JWT Assertion for Token operation is returning the error message “The ‘assertion’ is invalid”. What can I do?
Check for these common issues:
- Scope Format: Make sure that the
scopeclaim is formatted as a string array, not as a single string. - Key ID Verification: Confirm that the
kidparameter matches the SSA’s private key. If needed you can delete the current key and create a new one. - Missing Claims: Ensure that all required claims are included in your assertion.
- Expiration Time: Verify if the token expiry is set to a value between 0-5 minutes from now. Tokens with longer expiration times will be rejected.
- Audience Value: Ensure that the
audclaim is set to https://developer.api.autodesk.com/authentication/v2/token.
- Scope Format: Make sure that the