Initializing the Connector UI
Overview
Before initializing the Connector UI, certain prerequisite classes must be implemented to ensure smooth operation. These include CustomReadWriteModel and MainThreadInvoker, which manage data exchanges and ensure UI thread safety, respectively.
Prerequisites
Required Classes
| Class Name | Base Class / Interface |
|---|---|
CustomReadWriteModel |
BaseReadWriteExchangeModel |
MainThreadInvoker |
IMainThreadInvoker |
Implementing CustomReadWriteModel
The CustomReadWriteModel class serves as the critical bridge between your host application and the Data Exchange SDK, acting as the primary interface for all data exchange operations. By extending BaseReadWriteExchangeModel, this class defines how your application handles incoming data exchanges, manages exchange lifecycles, and responds to user interactions from the Connector UI.
Key responsibilities include:
- Exchange Management: Loading and unloading data exchanges within your host application
- Data Synchronization: Updating exchange data when changes occur in the cloud or locally
- Application Integration: Translating between the SDK’s data model and your application’s native data structures
- UI Communication: Providing the Connector UI with methods to query and manipulate exchange data
The implementation below shows a minimal example that can be extended based on your application’s specific requirements:
public class CustomReadWriteModel : BaseReadWriteExchangeModel
{
    public CustomReadWriteModel(IClient client) : base(client) {}

    public override Task UpdateExchangeAsync(ExchangeItem exchangeItem, CancellationToken cancellationToken = default)
    {
        return Task.CompletedTask;
    }

    public override Task<IEnumerable<string>> UnloadExchangesAsync(List<ExchangeItem> exchanges)
    {
        return Task.FromResult(Enumerable.Empty<string>());
    }
}
Implementing MainThreadInvoker
The MainThreadInvoker is a critical component that ensures thread safety between the Connector UI and your host application. Since the Connector UI runs in a separate process and communicates with your application through the Interop Bridge, any operations that affect your application’s UI or require main thread access must be properly marshaled.
Why Thread Safety Matters:
- Most UI frameworks (WPF, WinForms, etc.) require UI updates to occur on the main thread
- Cross-thread operations can cause exceptions, deadlocks, or unpredictable behavior
- The Connector UI may trigger actions in your application that need to update visual elements or access thread-affinity resources
Key Scenarios Requiring Main Thread Execution:
- Updating your application’s UI in response to exchange operations
- Accessing application-specific APIs that require main thread context
- Triggering selection, highlighting, or navigation within your host application
- Showing progress indicators or status updates in your application’s interface
The implementation varies by UI framework, as each provides different mechanisms for thread marshaling:
WPF
For WPF applications, the Dispatcher provides a robust queuing mechanism for cross-thread operations. This implementation checks if the current thread has access to the UI thread and either executes immediately or schedules the operation through the dispatcher queue:
public class WpfMainThreadInvoker : IMainThreadInvoker
{
    private readonly Dispatcher dispatcher;

    public WpfMainThreadInvoker(Dispatcher dispatcher)
    {
        this.dispatcher = dispatcher;
    }

    public async Task<T> InvokeAsync<T>(Func<Task<T>> func)
    {
        if (this.dispatcher.CheckAccess())
            return await func();

        var operation = await this.dispatcher.InvokeAsync(func);
        return await operation;
    }
}
WinForms
For Windows Forms applications, ISynchronizeInvoke (typically implemented by Control or Form) provides the standard mechanism for thread marshaling. This implementation checks if an invoke is required and handles the cross-thread call appropriately:
public class WinFormsMainThreadInvoker : IMainThreadInvoker
{
    private readonly ISynchronizeInvoke synchronizeInvoke;

    public WinFormsMainThreadInvoker(ISynchronizeInvoke synchronizeInvoke)
    {
        this.synchronizeInvoke = synchronizeInvoke ?? throw new ArgumentNullException(nameof(synchronizeInvoke));
    }

    public async Task<T> InvokeAsync<T>(Func<Task<T>> func)
    {
        if (synchronizeInvoke.InvokeRequired)
        {
            return await (Task<T>)synchronizeInvoke.Invoke(new Func<Task<T>>(() => func()), null);
        }
        return await func();
    }
}
Initializing the Connector UI
Once you have implemented the required classes, you can initialize the Connector UI through a carefully orchestrated process. The initialization involves several distinct phases: SDK configuration, dependency injection, bridge setup, and UI process launching. Each step builds upon the previous one to create a fully functional integration between your host application and the Connector UI.
This process establishes a secure, authenticated connection to Autodesk’s services while providing the UI with all necessary application-specific implementations for seamless operation.
Step 1: Configure SDK Options
The SDK options define your application’s identity and authentication parameters for connecting to Autodesk’s Data Exchange services. These settings establish your application’s credentials and provide metadata that will be displayed in the UI and used for telemetry:
var sdkOptions = new SDKOptionsDefaultSetup()
{
    ClientId = "xxxxxx",
    CallBack = "https://...",
    ConnectorName = "My Connector",
    ConnectorVersion = "1.0.0",
    HostApplicationName = "Host Application",
    HostApplicationVersion = "2024.9"
};

var client = new Client(sdkOptions);
Step 2: Set Up Dependencies
Next, instantiate your custom implementations along with any additional data providers your application requires. The BaseHostDataProvider can be extended to provide application-specific context and metadata to the Connector UI:
var customReadWriteModel = new CustomReadWriteModel(client);
var hostDataProvider = new BaseHostDataProvider();
var mainThreadInvoker = new MainThreadInvoker(Dispatcher.CurrentDispatcher);
Step 3: Configure the Interop Bridge
The Interop Bridge is the core communication infrastructure that enables bidirectional interaction between your host application and the separate Connector UI process. It handles serialization, process management, and ensures that all operations are properly routed through your custom implementations:
Bridge Configuration Options:
- Exchange: Your custom read/write model for data operations
- Invoker: Thread marshaling for UI safety
- HostDataProvider: Application context and metadata
- FeedbackUrl: Optional URL for user feedback collection
- ContactSupportUrl: URL or
mailto:link for the Contact Support action in the Info menu. Accepts an HTTPS URL (opens browser) or amailto:link (opens mail client). Always set this to your connector’s support channel. If omitted, support requests from your users will be misdirected. - HostWindowHandle: Enables proper parent-child window relationships
var bridgeOptions = InteropBridgeOptions.FromClient(client);

bridgeOptions.Exchange = customReadWriteModel;
bridgeOptions.Invoker = mainThreadInvoker;
bridgeOptions.HostDataProvider = hostDataProvider;
bridgeOptions.FeedbackUrl = "https://...";
bridgeOptions.ContactSupportUrl = "https://your-support-page.com";  // required — set to your support channel
bridgeOptions.HostWindowHandle = hostWindowHandle;

var bridge = InteropBridgeFactory.Create(bridgeOptions);
Note: Although
HostWindowHandleis optional, specifying it allows the Connector UI to behave as a child window of your host application — enabling better focus and minimize/restore behavior.
Step 4: Launch the Connector UI
The final step launches the Connector UI as a separate process and establishes the communication channel. The InitializeAsync method sets up the bridge infrastructure, while LaunchProcessAsync starts the UI process and begins message handling:
await bridge.InitializeAsync();
await bridge.LaunchProcessAsync();
Configuring Feature Capabilities
Not all connectors support every feature. A lightweight export connector might not need element selection, and a read-only connector doesn’t need a cancel button for fast operations.
Your connector declares what it supports using the FeatureCapabilities class. The UI only shows buttons and menu items for capabilities you enable, creating a cleaner experience tailored to your connector.
Available Capabilities
| Capability | Description |
|---|---|
EnableTaskCancellation |
Shows cancel button during long-running operations |
EnableHideUnhideExchange |
Allows users to hide/show exchanges in the list |
EnableSelectElements |
Adds "Select Elements" to the context menu (enabled by default) |
ShowTitleBarBetaBadge |
Displays a Beta badge in the Connector UI title bar (disabled by default) |
Beta Title Bar Badge
Use ShowTitleBarBetaBadge to display a Beta badge next to your connector name in the Connector UI title bar. This signals to users that the connector is in preview or early access — no custom styling required.
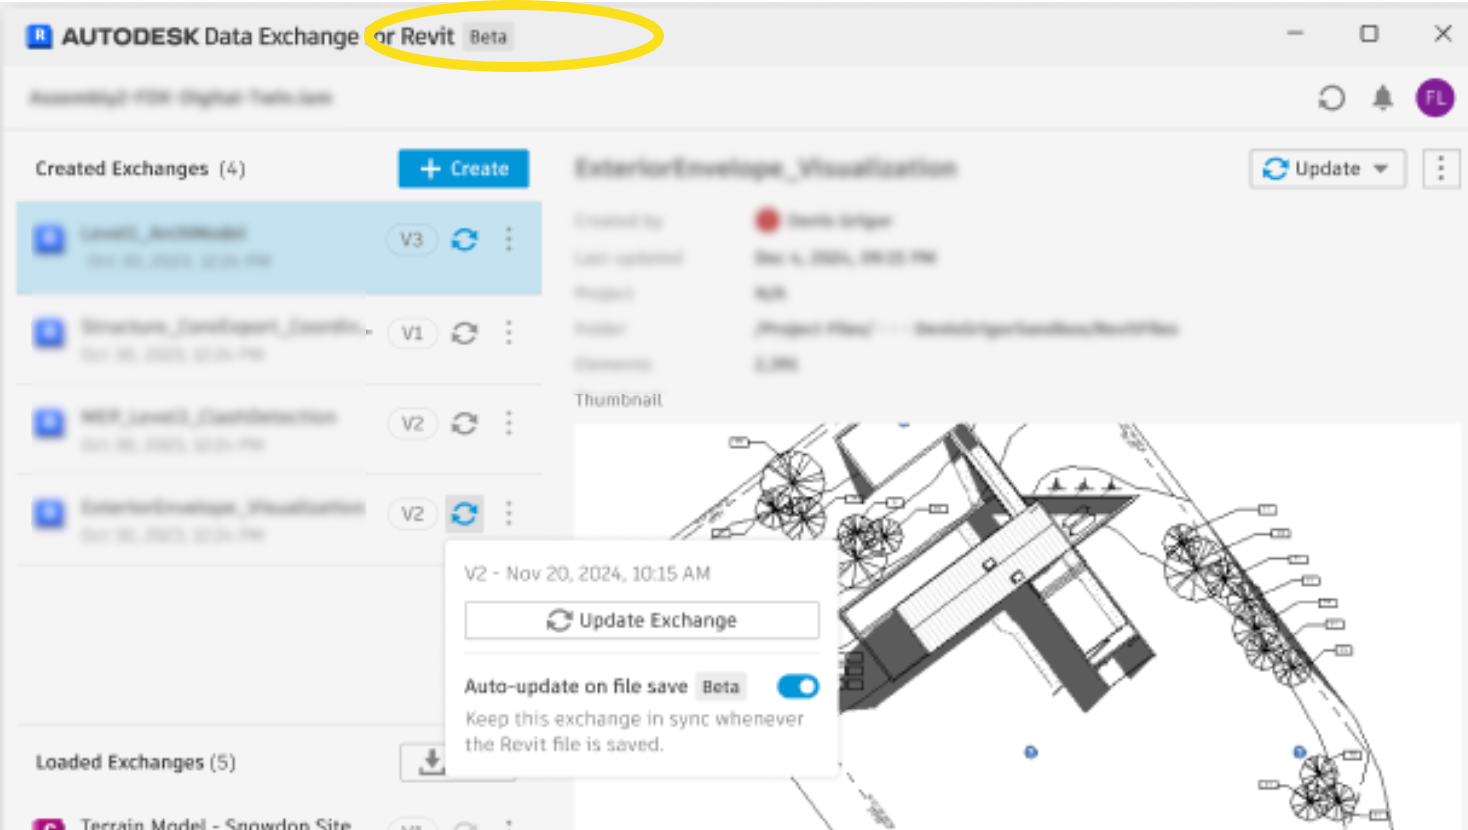
When to enable it:
- Your connector is in active development and behavior may change
- You’re running an early-access or preview program
- You want to set explicit expectations before a stable release
- You’re testing new capabilities with a subset of users
When to leave it off:
- Your connector is in a stable, production release
- The badge would be misleading or confusing to your users
The badge is off by default (ShowTitleBarBetaBadge = false). You opt in — it never appears unless you ask for it.
// Enable — connector is in beta or preview
bridgeOptions.FeatureCapabilities = new FeatureCapabilities
{
    ShowTitleBarBetaBadge = true
};

// Disable — connector is stable (or just omit the property entirely)
bridgeOptions.FeatureCapabilities = new FeatureCapabilities
{
    ShowTitleBarBetaBadge = false
};
Configuration Example
var bridgeOptions = InteropBridgeOptions.FromClient(client);

// Configure feature capabilities
bridgeOptions.FeatureCapabilities = new FeatureCapabilities
{
    EnableTaskCancellation = true,
    EnableHideUnhideExchange = true,
    EnableSelectElements = true,       // Default; set false to disable
    ShowTitleBarBetaBadge = true       // Omit or set false for stable releases
};

bridgeOptions.Exchange = customReadWriteModel;
bridgeOptions.Invoker = mainThreadInvoker;

var bridge = InteropBridgeFactory.Create(bridgeOptions);
Connector Type Examples
| Connector Type | Recommended Capabilities |
|---|---|
| Full read-write connector | All capabilities enabled |
| Read-only viewer | Default (EnableSelectElements enabled) |
| Background sync service | None (no user interaction) |
| Beta / early-access connector | ShowTitleBarBetaBadge = true |
Recommended Beta Configuration
When shipping a connector in beta or early access, combine all three new v7.6.0 options for a consistent experience:
// Full beta setup
bridgeOptions.ContactSupportUrl = "mailto:your-team@example.com";  // required — set to your support channel

bridgeOptions.FeatureCapabilities = new FeatureCapabilities
{
    ShowTitleBarBetaBadge = true  // signals beta status in the title bar
};

// In custom forms, mark individual experimental fields:
new TextFieldDescriptor("advancedExportFormat")
{
    Title = "Export Format",
    Description = "This format is experimental and may change in future versions.",
    IsBeta = true
}
When the connector reaches production:
- Set
ShowTitleBarBetaBadge = false - Remove
IsBeta = truefrom any form fields - Keep
ContactSupportUrlpointing to your support channel
Switching Application Mode at Runtime
Connectors can dynamically switch between read-only, write-only, and read-write modes while running. This enables permission-based workflows and context-sensitive UI without requiring users to restart the application.
Note: This feature requires the
Autodesk.DataExchange.Core.Modelsnamespace.
Available Modes
| Mode | Description | UI Behavior |
|---|---|---|
ReadOnly |
Users can only load and view existing exchanges | Create button hidden |
WriteOnly |
Users can only create new exchanges | Load button hidden |
ReadWrite |
Users can both load and create exchanges | All buttons visible |
By default, the application mode is determined by which base model class you use (BaseReadOnlyExchangeModel, BaseWriteOnlyExchangeModel, or BaseReadWriteExchangeModel). However, if your connector uses BaseReadWriteExchangeModel, you can switch between modes at runtime using the SetApplicationMode method.
When to Use Runtime Mode Switching
- Permission-based workflows: Show read-only mode to users without edit permissions, then switch to read-write when they authenticate with higher privileges
- Context-sensitive UI: Start in write-only mode during export workflows, switch to read-only for review workflows
- Progressive disclosure: Begin with a simpler read-only view, then enable full functionality when the user requests it
Usage
using Autodesk.DataExchange.Core.Models;

// Switch to read-only mode
bridge.SetApplicationMode(ApplicationMode.ReadOnly);

// Switch to write-only mode
bridge.SetApplicationMode(ApplicationMode.WriteOnly);

// Switch back to read-write mode
bridge.SetApplicationMode(ApplicationMode.ReadWrite);
Requirements
- Your connector must be initialized with
BaseReadWriteExchangeModel(read-write mode) - Calling
SetApplicationModeon a connector initialized withBaseReadOnlyExchangeModelorBaseWriteOnlyExchangeModelthrowsInvalidOperationException
Error Handling
try
{
    bridge.SetApplicationMode(ApplicationMode.ReadOnly);
}
catch (InvalidOperationException ex)
{
    // Connector was not initialized in ReadWrite mode
    logger.Error("Cannot switch modes: " + ex.Message);
}
Example: Permission-Based Mode Switching
public class MyConnector
{
    private IInteropBridge bridge;
    private bool userCanEdit;

    public async Task InitializeAsync(bool canEdit)
    {
        userCanEdit = canEdit;

        // Always initialize with ReadWrite model for flexibility
        var model = new CustomReadWriteModel(client);

        var options = InteropBridgeOptions.FromClient(client);
        options.Exchange = model;
        // ... other options ...

        bridge = InteropBridgeFactory.Create(options);
        await bridge.InitializeAsync();
        await bridge.LaunchProcessAsync();

        // Restrict mode based on permissions
        if (!userCanEdit)
        {
            bridge.SetApplicationMode(ApplicationMode.ReadOnly);
        }
    }

    public void OnPermissionsChanged(bool canEdit)
    {
        // Update mode when permissions change
        if (canEdit)
        {
            bridge.SetApplicationMode(ApplicationMode.ReadWrite);
        }
        else
        {
            bridge.SetApplicationMode(ApplicationMode.ReadOnly);
        }
    }
}
Switching Application Mode at Runtime
Connectors can dynamically switch between read-only, write-only, and read-write modes while running. This enables permission-based workflows and context-sensitive UI without requiring users to restart the application.
Note: This feature requires the
Autodesk.DataExchange.Core.Modelsnamespace.
Available Modes
| Mode | Description | UI Behavior |
|---|---|---|
ReadOnly |
Users can only load and view existing exchanges | Create button hidden |
WriteOnly |
Users can only create new exchanges | Load button hidden |
ReadWrite |
Users can both load and create exchanges | All buttons visible |
By default, the application mode is determined by which base model class you use (BaseReadOnlyExchangeModel, BaseWriteOnlyExchangeModel, or BaseReadWriteExchangeModel). However, if your connector uses BaseReadWriteExchangeModel, you can switch between modes at runtime using the SetApplicationMode method.
When to Use Runtime Mode Switching
- Permission-based workflows: Show read-only mode to users without edit permissions, then switch to read-write when they authenticate with higher privileges
- Context-sensitive UI: Start in write-only mode during export workflows, switch to read-only for review workflows
- Progressive disclosure: Begin with a simpler read-only view, then enable full functionality when the user requests it
Usage
using Autodesk.DataExchange.Core.Models;

// Switch to read-only mode
bridge.SetApplicationMode(ApplicationMode.ReadOnly);

// Switch to write-only mode
bridge.SetApplicationMode(ApplicationMode.WriteOnly);

// Switch back to read-write mode
bridge.SetApplicationMode(ApplicationMode.ReadWrite);
Requirements
- Your connector must be initialized with
BaseReadWriteExchangeModel(read-write mode) - Calling
SetApplicationModeon a connector initialized withBaseReadOnlyExchangeModelorBaseWriteOnlyExchangeModelthrowsInvalidOperationException
Error Handling
try
{
    bridge.SetApplicationMode(ApplicationMode.ReadOnly);
}
catch (InvalidOperationException ex)
{
    // Connector was not initialized in ReadWrite mode
    logger.Error("Cannot switch modes: " + ex.Message);
}
Example: Permission-Based Mode Switching
public class MyConnector
{
    private IInteropBridge bridge;
    private bool userCanEdit;

    public async Task InitializeAsync(bool canEdit)
    {
        userCanEdit = canEdit;

        // Always initialize with ReadWrite model for flexibility
        var model = new CustomReadWriteModel(client);

        var options = InteropBridgeOptions.FromClient(client);
        options.Exchange = model;
        // ... other options ...

        bridge = InteropBridgeFactory.Create(options);
        await bridge.InitializeAsync();
        await bridge.LaunchProcessAsync();

        // Restrict mode based on permissions
        if (!userCanEdit)
        {
            bridge.SetApplicationMode(ApplicationMode.ReadOnly);
        }
    }

    public void OnPermissionsChanged(bool canEdit)
    {
        // Update mode when permissions change
        if (canEdit)
        {
            bridge.SetApplicationMode(ApplicationMode.ReadWrite);
        }
        else
        {
            bridge.SetApplicationMode(ApplicationMode.ReadOnly);
        }
    }
}
Working with Exchange Operation Events
When users interact with the Connector UI — creating exchanges, loading data, or syncing updates — your host application often needs to respond. For example:
- A user creates an exchange, and you want to refresh the project tree to show the new item.
- A user clicks “Load Latest,” and you need to update your viewport with the new geometry.
- A user initiates an operation, and you want to prevent the window from closing until it finishes.
The ExchangeOperationCompleted event notifies your application when these operations complete, enabling you to coordinate behavior between the Connector UI and your host application.
When the event fires:
- After the SDK has finished processing the operation.
- After cleanup operations have completed (StopSession, SkippedElements logging).
- After the response has been delivered to the Connector UI.
Note: This feature requires the
Autodesk.DataExchange.UI.Core.EventArgsandAutodesk.DataExchange.UI.Core.Enumsnamespaces.
When to Use
Use this event for:
- Triggering post-operation workflows.
- Updating custom UI after operations.
- Logging operation metrics and analytics.
- Coordinating window close behavior.
- Refreshing related data.
Don’t use this event for:
- Blocking operations — the event fires after completion.
- Modifying operation behavior — it’s too late at this point.
- Validating inputs — use custom forms instead.
Basic Setup
Subscribe to the event before initializing the bridge:
public class MyConnector
{
    private IInteropBridge bridge;

    public async Task InitializeAsync()
    {
        var options = InteropBridgeOptions.FromClient(client);
        // ... configure options ...

        bridge = InteropBridgeFactory.Create(options);

        // Subscribe before initializing
        bridge.ExchangeOperationCompleted += OnExchangeOperationCompleted;

        await bridge.InitializeAsync();
        await bridge.LaunchProcessAsync();
    }

    private void OnExchangeOperationCompleted(
        object sender,
        ExchangeOperationCompletedEventArgs e)
    {
        logger.Info(
            $"Exchange operation {e.OperationType} " +
            $"{(e.Succeeded ? "succeeded" : "failed")}"
        );
    }

    public void Cleanup()
    {
        // Unsubscribe when done
        if (bridge != null)
        {
            bridge.ExchangeOperationCompleted -= OnExchangeOperationCompleted;
        }
    }
}
Pattern: Refresh UI After Operations
Refresh different parts of your UI based on which operation completed:
bridge.ExchangeOperationCompleted += (sender, e) =>
{
    if (!e.Succeeded)
    {
        return; // Don't refresh on failure
    }

    // Operations that modify exchange list
    if (e.OperationType == ExchangeOperationType.Create ||
        e.OperationType == ExchangeOperationType.Delete)
    {
        RefreshExchangeList();
    }

    // Operations that modify current exchange
    if (e.OperationType == ExchangeOperationType.Update ||
        e.OperationType == ExchangeOperationType.Load)
    {
        RefreshCurrentExchangeView();
    }
};
Note: A programmatic
RefreshExchangeList()call is treated as a soft refresh — theForceRefreshflag on theExchangeSearchFilterpassed to yourGetExchangesAsyncimplementation staysfalse, so your connector may return cached results. Only a user clicking the Refresh button in the Connector UI setsForceRefreshtotrue, signaling a hard refresh that should bypass the cache. See Refreshing the exchange list.
Pattern: Close UI After Operation Completes
Automatically close the Connector UI after an operation completes — useful when the UI is launched for a specific task and should dismiss itself afterward:
public class ConnectorWindow : Window
{
    private IInteropBridge bridge;

    private void InitializeBridge()
    {
        bridge = InteropBridgeFactory.Create(options);

        // Close UI after operation completes
        bridge.ExchangeOperationCompleted += (s, e) =>
        {
            if (e.Succeeded)
            {
                this.bridge.SetWindowState(WindowState.Close);
            }
        };
    }
}
Use cases:
- Single-action workflows (e.g., “Create and close”)
- Background sync connectors that open UI only for specific operations
- Streamlined user experience where UI dismisses after task completion
Pattern: Analytics Tracking
Send operation metrics to your analytics service:
bridge.ExchangeOperationCompleted += (sender, e) =>
{
    var properties = new Dictionary<string, string>
    {
        ["OperationType"] = e.OperationType.ToString(),
        ["Success"] = e.Succeeded.ToString(),
        ["Timestamp"] = DateTime.UtcNow.ToString("o")
    };

    analyticsService.TrackEvent("ExchangeOperation", properties);

    if (!e.Succeeded)
    {
        analyticsService.TrackEvent("ExchangeOperationFailure", properties);
    }
};
Pattern: Error Handling
Monitor consecutive failures and prompt the user when issues persist:
private int consecutiveFailures = 0;

bridge.ExchangeOperationCompleted += (sender, e) =>
{
    if (e.Succeeded)
    {
        consecutiveFailures = 0;
    }
    else
    {
        consecutiveFailures++;

        if (consecutiveFailures >= 3)
        {
            // Show user intervention dialog
            ShowConnectionIssueDialog();
        }
    }
};
Event Timing
The event fires at a specific point in the operation lifecycle:
User clicks "Create Exchange"
    ↓
UI sends CreateExchangeRequest to SDK
    ↓
SDK processes (elements, geometry, etc.)
    ↓
SDK calls StopSession, logs skipped elements
    ↓
SDK sends response to UI
    ↓
UI receives response
    ↓
[ExchangeOperationCompleted EVENT FIRES] ← You are here
    ↓
UI shows success/error message to user
Thread Safety
The event is raised on the main thread (via IMainThreadInvoker). It is safe to update UI elements directly from the event handler:
bridge.ExchangeOperationCompleted += (sender, e) =>
{
    // Safe to update UI - already on main thread
    statusLabel.Text = $"Operation {e.OperationType} completed";
    progressBar.Visible = false;
};
Multiple Subscribers
Multiple handlers can subscribe to the same event:
// Analytics module
bridge.ExchangeOperationCompleted += TrackAnalytics;

// UI module
bridge.ExchangeOperationCompleted += UpdateUI;

// Workflow module
bridge.ExchangeOperationCompleted += TriggerWorkflows;
All handlers are invoked in subscription order.
Next Steps
- Migration Guide — Migrating from v7.1.x
- Implementing SelectElementsAsync — Handle the Select Elements capability
- v7.6.0 Changelog — Full release notes
- Creating a Custom Progress Reporter — Track operation progress