

Building a React Native App - presented at DevCon/AU-2017 Nov14th 2pm
In this post, We will walk through 'building a basic React Native app' that can handle A360 login so you can access A360docs/Fusion360docs and BIM360-docs design files. With the mobile version of Forge Viewer, you can view your existing 2D drawings and section 3D design files - think of it as a 'toy' version of Autodesk's A360Docs/Fusion360 mobile app.
Part 1 - of this two part blog series, covers "getting started", "building a UI", and "connecting to Forge Login"
Part 2 - will focus on the controlling the headless Forge Viewer API with Native UI
Introduction
I’ve been interested in React Native for a while, and have been wanting to use it to build a mobile version of the popular three-legged NodeJs Forge sample code. The biggest challenge here, is 'Authentication on mobile'. We want our phone to remember our login info, and not bother us again (until we uninstall or sign-out).
The end result of this blog post, is a template called 'Forge Mobile App'. You can find the GitHub repo here. It connects to the Forge API and gives you the basics for building native UI with React Native
Try the Live Demo:

> Install 'Expo' on your Phone
> Scan QR code
  |
Why React Native?
React Native is a flavor of React, so if you are familiar with React development, then you'll be right at home. In particular, we are leveraging the new 'Create React Native App' or CRNA and using Expo App to test things.
Another popular alternative is Cordova (and it's offspring Ionic) which uses a webBrowser to display the UI. Cordova framework suffers from web performance problems on mobile, such as 'animation jank', Navigation bugs, keyboard popup bugs with Form input and memory bloat.
React Native Apps are written in javascript, where the JSC/V8 engine creates & manipulates Native UI components for both iPhone and Android platforms. This gives your app speed and the buttery smooth animation, of a typical native app written in Xcode/Swift and Android Studio/Java. Hence, React Native app's don't suffer the problems that Cordova/Ionic do.
React Native, or RN for short, is developed by Facebook and has a vibrant React community. It continues to trend in popularity and many companies like Walmart, AirBnb, Instagram, Facebook and Oculus (React VR) are building flagship app’s with React Native.
1. Getting Started - Hello World
Setup
- Install ‘Expo’ on your Android or iPhone (go to the App store)
- install Expo's desktop tool 'XDE’ on your Mac / Windows computer
- Launch XDE
- click 'Create New Project', use 'Blank' template
- Type in project name 'forgeapp' and click 'Create' (see the video)
4. click the 'settings' button, and select ’LAN’ (see the video)
5. Click 'Share' to see a QR-code
6. Now scan the QR Code with the Expo app on your iPhone/Android
 |
If you see something like this, then Congrats ! - You’ve now got the basic mobile dev environment up and running.
Let’s look at 'App.js'
This is the entry file for our App. It is standard react code, with the difference that <DIV> elements are named <VIEW> and <TEXT> in react native. The React Native Introduction has more details.
Now, if you edit the text message in App.js, with a text editor (say VSCode or Sublime Text 3) and click save, your phone will automatically update with the change.
Note: Your phone and computer should be on same Wifi network. If you have Xcode installed, you can use the IOS simulator and work without a network (& offline), but note that 3D performance is slower.
2. Adding UI - The 'Shell App'
Next, let's add some UI. Our app needs some kind of 'file browser' and a '2D/3D viewer', so we'll use the classic iPhone tabs metaphor to switch between these two 'Views'. This will be our ‘shell app’ UI and we can use ‘dummy data’ to get us started. Here are the three UI components we'll use:
- React-Navigation (Tabs and Views)
- FlatList (List of files)
- WebView (Forge Viewer)
The react-navigation component is what glues together, the 'Tab' bar at the bottom, the file browser (FlatList) and the Forge viewer (webView).
Setup
- Copy these files from gist - App.js, js/fileList.js, js/styles.js, js/viewer.js
- install react-navigation component...ie.
in XDE, click project, open in terminal, and type...
> npm install react-navigation
- Now refresh your phone (Click share, Scan QR code)
You should see the result in the video above.
Here’s what’s going on:
We have the following new files:
App.js - this is our main entry file and contains a new ‘tab navigator’
js/fileList.js - this is the stack-Navigator, and it holds a List View
js/viewer.js - this is the Forge Viewer displayed in a webView
js/styles.js - this is a single file to define our UI color-scheme etc
fileList.js - Stack Navigation
The fileList.js file does two things - it renders a listView and navigates Views. You can see in lines 13-16 the dummy JSON data that the FlatList UI component is rendering. When you click on a list item, an event triggers line#36 onPress method which navigates, or 'pushes the next page view' onto the stackNavigator. Clicking the back pops the View off the stackNavigator without code. We will use listView and StackNavigator to build our files/folders tree structure. You can read more about Stack Navigation here: https://reactnavigation.org/docs/navigators/stack
3. Adding 'Login' and Forge Data
So far, we have created a ‘shell’ app which has dummy data. Now the tricky part - Let’s replace the dummy data with real data from the Forge Services.
To do that, we need to update FileList.js , viewer.js and add a new file Store.js
Setup
- Go ahead and copy these files from GitHub here:
- Create a new Forge App (follow this tutorial)
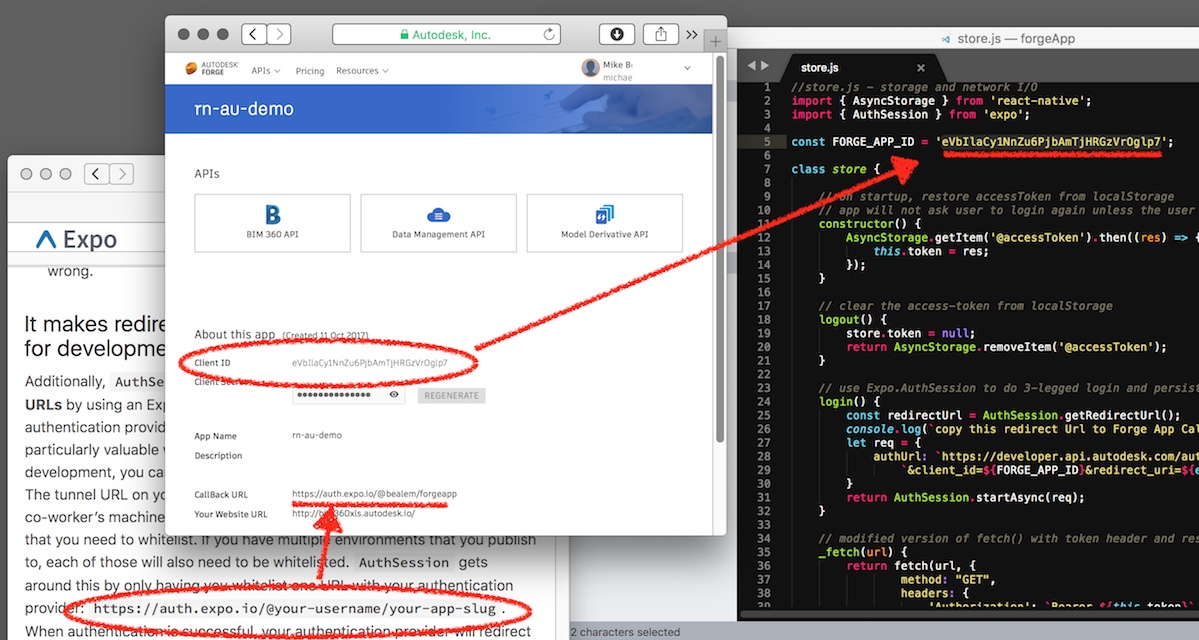
- copy your new Forge App’s CLIENTID into the variable ‘FORGE_APP_ID’ in file 'store.js'
- In the Forge Callback, set the ‘Redirect URL’ to this...
https://auth.expo.io/@your-username/your-app-slug
> where username and app are based on your Expo account and App.
Here is a screenshot of these changes:
- Now refresh your Phone and the app will launch
- click the ‘Login’ button on your iPhone
- Use your Autodesk credentials to login, allow Access.
If everything works, you should see...
|
> Scan QR Code
|
… the Autodesk login box appears, you type in your Forge login credentials, allow access, and the app refreshes the file list. You are logged in and ready to navigate through your files and folders.
So what has changed?
FileList.js
- The static list in fileList.js has been replaced with calls to store.js
- The method ‘handleRefresh’ processes ForgeDM data into folder navigation
- We added a login and logout button that uses AuthSession library from Expo
- We added a spinner during loading ( ‘pull to refresh’ UI )
- We added a ‘file details’ UI
Digging into the Store.js file
- store is a singleton class (line 90)
- it keeps application state (in future, I'll use MobX)
- it handles network IO to the Forge API (line 69-86)
- it remember’s the user’s login by persisting the accessToken in AsyncStore (line 11-14)
Notes: Explaining 3-legged OAuth on mobile
During the last part of the 3-legged oAuth handshake (see diagram, step 3,4 & 5), our mobile app needs to get a callback from the Forge API. Obviously, configuring the Forge callback to point to a mobile phone’s IP address directly is a "bad idea", so we need to use a 'middle man' (3rd party cloud server) that can associate a mobile device with a Forge callback. Currently I use Expo service with the AuthSession component.

Our sample app requests an access-token via an 'Implicit Grant' directly to the Forge Service. You can see this in the file store.js/login() line 24-32.
The url also contains a special callbackURL, that goes back to the Expo server - our 'middle man'.
The Expo Server, has a 'session cookie' of each iPhone/Android's IP address and transmits the access-token message. AuthSession library is waiting for this message from the Expo server and finally passes it to our React Native app (that's a promise, excuse the pun) and we then use it in all future 'fetch' requests to the Forge APIs.
In the original NodeJS sample, we hosted a Heroku nodeJS server to connect the browser to the Forge callback, using a session cookie.
Before we publish our app to the Apple/Android App Store, we should consider replacing the Expo service with our own server. We will follow up in a later tutorial using Serverless (see my previous Blog: Serverless and ClaudiaJS).
4. Sharing your App with other iPhone users
One of the reasons for using Expo and XDE was it's feature to 'Publish your app'. This gives you a *very* convenient way to let others try out your new app on their own phone. It delays the decision to buy an Apple Developer Account, MacBook, install Xcode, build and deploy. Just share the QRCode, like the one I posted in the title of this blog, and away you go !
Remember to follow @micbeale on Twitter.
..Feel free to add any issues you find to my Github issues repo.
Stay tuned for part Two !
----------------------
React Native Tips:
1. To setup React Native for debugging, install VSCode and follow this youtube example
2. To speed up development, activate Hot Reloading: Shake the phone and tap ‘disable live reload’, and then tap ‘enable hot-reload’