
MCP has quickly become the standard way for AI assistants to interact with external tools and data. But until recently, there was a significant limitation: everything an MCP server could return was just static content. That changes with MCP Apps.
What Are MCP Apps?
MCP Apps is an official extension to the MCP specification (SEP-1865) that lets MCP servers deliver interactive HTML interfaces directly inside the conversation. Instead of just returning static content like text or images, a tool can now pop up a fully interactive widget (a form, a dashboard, a 3D viewer) right in the chat window.
This idea had already been explored by several community projects, most notably MCP-UI and OpenAI's Apps SDK, which explored a similar pattern for embedding interactive applications in AI conversations. The MCP Apps extension unifies these ideas into a single, standardized approach under the official MCP umbrella.
Why Not Just Send a Link?
You could build a standalone web app and have the AI return a URL. But MCP Apps offer key advantages:
- Context preservation - The UI lives inside the conversation. No tab-switching, no losing your place.
- Bidirectional data flow - The app can call MCP tools, and the host can push fresh data to the app. No separate API or auth layer needed.
- Security - Apps run in a sandboxed iframe. They can't access the host page, steal cookies, or escape their container.
- Host integration - The app can delegate actions to the host, leveraging the user's already-connected capabilities.
Which Clients Support MCP Apps Today?
At the time of writing, the following MCP clients support the MCP Apps extension:
- Claude (web) and Claude Desktop
- Visual Studio Code with GitHub Copilot
- Goose
- Postman
- MCPJam
Check the MCP clients page for the latest list.
APS Viewer Meets MCP Apps
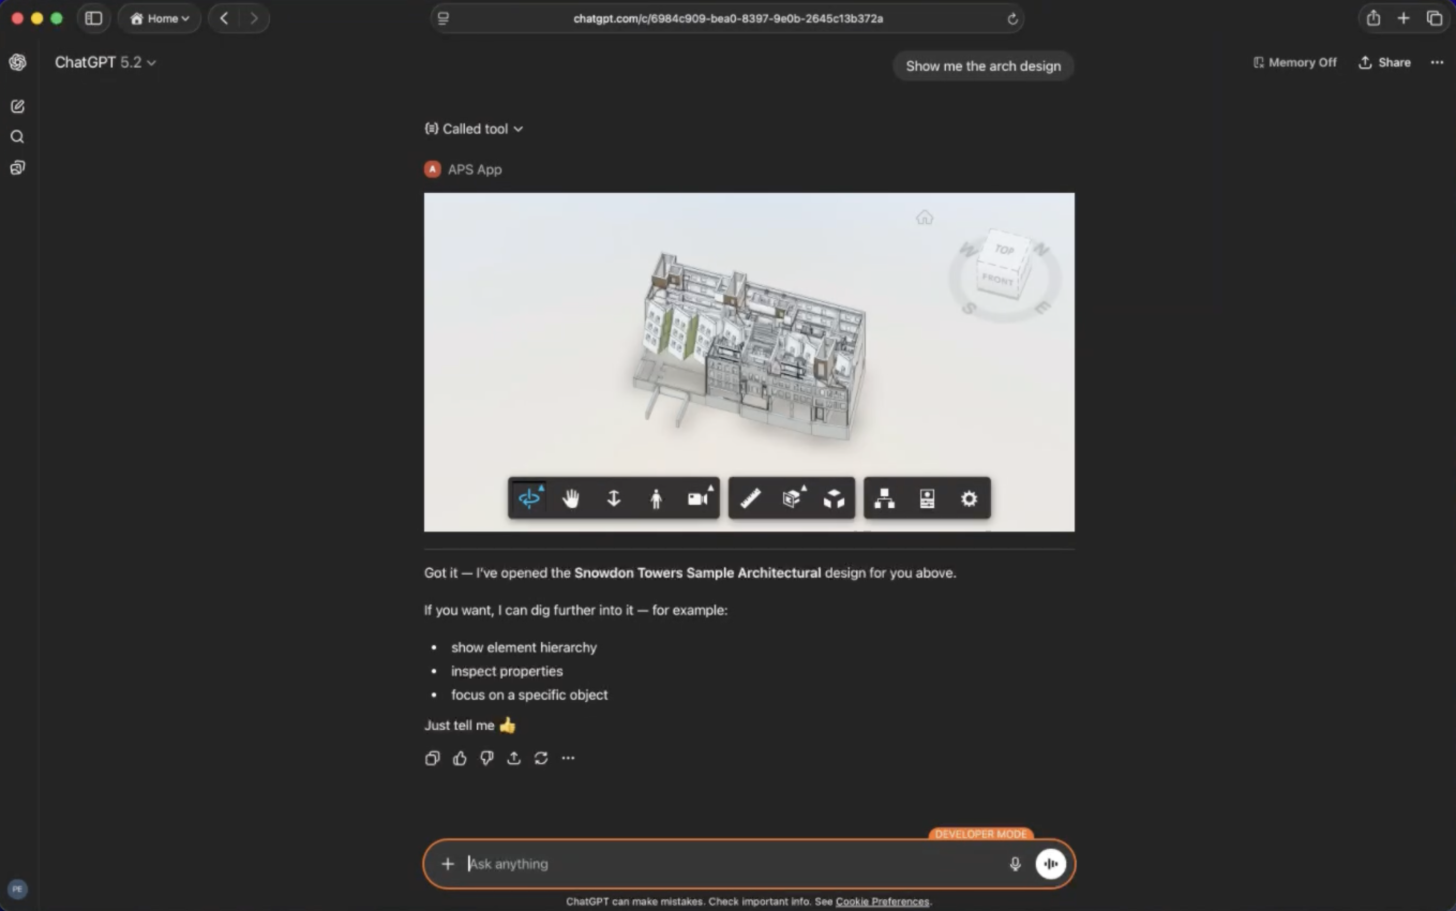
This is where things get exciting. With MCP Apps, we can embed APS Viewer directly inside an AI chat. Imagine asking your AI assistant:
"Show me the Snowdon Architecture design"
You can orbit, zoom, select elements, and report those selections back to the AI for further discussion ("Tell me more about this element").
Let's see how this works under the hood.
MCP Apps 101: A Minimal Example
Before diving into the APS Viewer integration, let's look at the simplest possible MCP App to understand the two core primitives: a UI resource and a tool that references it.
Step 1: Define the UI Resource
An MCP App's UI is served as a resource with a ui:// URI scheme. The resource returns an HTML page that the host will render inside a sandboxed iframe.
Here's a simple resource that returns a "Hello World" page:
import {
  registerAppResource,
  RESOURCE_MIME_TYPE,
} from "@modelcontextprotocol/ext-apps/server";

// const server = new McpServer({ ... });

const RESOURCE_URI = "ui://hello/hello.html";

registerAppResource(
  server,
  "hello-ui",          // resource name
  RESOURCE_URI,        // ui:// URI
  { mimeType: RESOURCE_MIME_TYPE },
  async () => ({
    contents: [{
      uri: RESOURCE_URI,
      mimeType: RESOURCE_MIME_TYPE,
      text: `
        <!DOCTYPE html>
        <html>
          <body>
            <h1>Hello World!</h1>
          </body>
        </html>
      `,
    }],
  })
);
The key ingredients:
ui://URI - The scheme tells the host this is a UI resource, not a regular file.RESOURCE_MIME_TYPE- The TypeScript SDK provides the correct MIME type for MCP App resources (text/html; MCP_EXT_APP).registerAppResource- A helper from@modelcontextprotocol/ext-apps/serverthat handles the plumbing of registering the resource with the MCP server.
Step 2: Create a Tool That References the Resource
Now we need a tool that the LLM can call. The magic is in the _meta.ui.resourceUri field - it tells the host "when this tool is called, also render this UI resource":
import { registerAppTool } from "@modelcontextprotocol/ext-apps/server";

// const server = new McpServer({ ... });

registerAppTool(
  server,
  "say-hello",
  {
    title: "Say Hello",
    description: "Displays a friendly greeting.",
    inputSchema: {},
    _meta: {
      ui: {
        resourceUri: RESOURCE_URI,   // <-- links to our UI resource
      },
    },
  },
  async () => ({
    content: [{ type: "text", text: "Hello from the server!" }],
  })
);
That's it. When a user asks the AI something that triggers the say-hello tool, the host will:
- Call the tool on the server
- Fetch the
ui://hello/hello.htmlresource - Render the returned HTML in a sandboxed iframe inside the chat
- Pass the tool result to the UI
The Real Thing: APS Viewer as an MCP App
Now let's look at how the APS MCP App example uses this pattern to embed the Viewer in an AI conversation.
The Tool: preview-design
The preview-design tool is what the LLM calls when a user asks to see a design. It takes a project ID and design ID, fetches the necessary credentials and metadata from APS, and returns the configuration the viewer needs to load the model:
// tools/preview-design.js
import z from "zod";
import { dataManagementClient } from "./common.js";
import { getServiceAccountAccessToken } from "../auth.js";
import { VIEWER_RESOURCE_URI } from "../resources/viewer.js";

export const previewDesignToolFactory = ({ derivativeFormat }) => ({
    name: "preview-design",
    config: {
        title: "Preview design",
        description: "Displays an interactive preview of the specified design.",
        inputSchema: {
            projectId: z.string().nonempty().describe("The ID of the project the design belongs to."),
            region: z.string().optional().describe("The region of the project the design belongs to."),
            designId: z.string().nonempty().describe("The ID of the design to preview."),
        },
        annotations: { readOnlyHint: true },
        _meta: {
            ui: {
                resourceUri: VIEWER_RESOURCE_URI,
            },
        },
    },
    callback: async ({ projectId, designId, region = "US" }) => {
        const credentials = await getServiceAccountAccessToken(["viewables:read"]);
        const tip = await dataManagementClient.getItemTip(projectId, designId);
        const output = {
            name: tip.data.attributes.displayName,
            urn: tip.data.relationships.derivatives.data.id,
            config: {
                accessToken: credentials.access_token,
            }
        };
        switch (derivativeFormat) {
            case "fallback":
                output.config.env = "AutodeskProduction";
                output.config.api = region === "US"
                    ? "derivativeV2"
                    : `derivativeV2_${region}`;
                break;
            case "latest":
                output.config.env = "AutodeskProduction2";
                output.config.api = region === "US"
                    ? "streamingV2"
                    : `streamingV2_${region}`;
                break;
        }
        return {
            structuredContent: output,
            content: [{
                type: "text",
                text: `Here's the preview of ${output.name}`
            }]
        };
    }
});
Let's unpack the important parts:
_meta.ui.resourceUripoints toVIEWER_RESOURCE_URI("ui://preview-design/viewer.html"). This is the link between the tool and the viewer resource.inputSchemauses Zod to describe the parameters the LLM needs to provide - the project ID, an optional region, and the design ID. The MCP server exposes additional tools for browsing projects and designs, so the LLM can discover these IDs through conversation.structuredContentis the data payload that gets forwarded to the UI. It includes the document URN and the viewer configuration (access token, API endpoint, environment). This is how the tool passes data to the viewer without the UI needing its own API calls.contentis the text response the LLM sees - a simple confirmation message.
The Resource: viewer
The viewer resource serves the bundled HTML page that contains the APS Viewer. This is where Content Security Policy configuration becomes critical - the viewer needs to load scripts, stylesheets, and 3D content from Autodesk's CDN:
// resources/viewer.js
import { RESOURCE_MIME_TYPE } from "@modelcontextprotocol/ext-apps/server";
import { VIEWER_HTML, PUBLIC_ENDPOINT_URL } from "../config.js";

export const VIEWER_RESOURCE_URI = "ui://preview-design/viewer.html";

export const viewerResourceFactory = ({}) => ({
    name: "viewer",
    uri: VIEWER_RESOURCE_URI,
    config: {
        mimeType: RESOURCE_MIME_TYPE
    },
    callback: async () => {
        return {
            contents: [{
                uri: VIEWER_RESOURCE_URI,
                mimeType: RESOURCE_MIME_TYPE,
                text: VIEWER_HTML,
                _meta: {
                    ui: {
                        csp: {
                            resourceDomains: [
                                "https://developer.api.autodesk.com",
                                "https://cdn.derivative.autodesk.com",
                                "https://fonts.autodesk.com",
                                "blob:",
                                "data:",
                            ],
                            connectDomains: [
                                "https://developer.api.autodesk.com",
                                "https://cdn.derivative.autodesk.com",
                                "https://fonts.autodesk.com",
                                "wss://cdn.derivative.autodesk.com",
                            ],
                            frameDomains: [],
                        },
                        domain: PUBLIC_ENDPOINT_URL
                            ? `https://${PUBLIC_ENDPOINT_URL}`
                            : null,
                    },
                },
            }]
        };
    }
});
A few things to note:
VIEWER_HTMLis the bundled HTML file (built by Vite withvite-plugin-singlefile) that contains the viewer page and its JavaScript logic. Bundling everything into a single HTML string makes it easy to serve as an MCP resource.csp.resourceDomainslists the origins the iframe is allowed to load static assets from - the Viewer JS/CSS fromdeveloper.api.autodesk.com, derivative data fromcdn.derivative.autodesk.com, and fonts fromfonts.autodesk.com.csp.connectDomainslists the origins the iframe can make fetch/XHR/WebSocket requests to. Note thewss://entry - the SVF2 streaming format uses WebSockets to stream geometry data to the viewer.domainis optionally set for deployments behind a public URL, ensuring the CSP allowlist includes the server's own origin.
The UI: Connecting the Viewer to MCP
The viewer's client-side JavaScript uses the App class from @modelcontextprotocol/ext-apps to communicate with the host:
// ui/viewer.js
import { App } from "@modelcontextprotocol/ext-apps";

const app = new App({ name: "Design Viewer", version: "0.0.1" });
app.ontoolresult = (result) => {
    const urn = result.structuredContent?.urn;
    const config = result.structuredContent?.config;
    if (urn && config) {
        loadModel(urn, config);
    }
};
app.connect();
When the host calls the preview-design tool:
- The tool returns
structuredContentwith the URN and viewer config - The host pushes this result to the UI via
app.ontoolresult - The UI extracts the URN and config, and initializes the APS Viewer
The viewer also reports user interactions back to the AI through app.updateModelContext:
viewer.addEventListener(Autodesk.Viewing.SELECTION_CHANGED_EVENT, async () => {
    const ids = viewer.getSelection();
    if (ids.length > 0) {
        await app.updateModelContext({
            content: [{
                type: "text",
                text: `User selected objects with IDs: ${ids.join(", ")}`
            }],
        });
    }
});
This creates a truly bidirectional experience: the AI triggers the viewer, the user interacts with the 3D model, and their selections flow back to the AI for further analysis. You can select a wall in the viewer and ask "What material is this?" - the AI knows exactly which element you're pointing at.
See It in Action
ChatGPT
VS Code with GitHub Copilot
Postman
Wrapping Up
MCP Apps turn MCP servers from text-only tools into full interactive experiences. For you, this means 3D model viewers, property inspectors, and design dashboards can live right inside the AI conversation - no context switching, no separate web apps, no extra authentication.
The pattern is straightforward: define a UI resource, link it from a tool, and let the SDK handle the rest. If you want to try it yourself, checkout our code sample: APS MCP App example.