Creating a Webhook (Data Management)
This walkthrough demonstrates how to create a webhook that notifies your app when a Data Management event occurs in a folder, so your app can react to changes instead of polling. The steps include selecting an event type, finding the folder URN to use as the webhook scope, preparing the callback, creating and verifying the webhook, testing the webhook, and verifying callback authenticity.
For more details about the Data Management API, see the Data Management documentation.
Before You Begin
- Register an app and select both the Data Management API and the Webhooks API.
- Acquire an access token with the
data:readscope, which all Webhooks requests require, and thedata:createscope, which creating a webhook requires. For choosing and acquiring an access token, see Authentication for Webhooks. - Have access to the Data Management folder whose events you want to subscribe to.
Step 1: Select an Event Type
Data Management publishes events for versions, lineages, folders, and operations, all in the data system. For the full list and the trigger of each one, see Data Management Events.
You can cover several events with one webhook by using the asterisk (*) wildcard, which matches zero or more characters in the event name. For example, dm.* matches all Data Management events. See Supported Events.
In this walkthrough, assume that you want to subscribe to dm.version.added, whose documented trigger is: when a new version of an item is added to a folder. For the payload it delivers, see dm.version.added.
Step 2: Find the Folder URN
The scope of a Data Management webhook is a folder URN, which looks like urn:adsk.wipprod:fs.folder:co.wT5lCWlXSKeo3razOfHJAw. Folder is the only scope name Data Management events support, and scope is recursive: a webhook on a folder also covers its subfolders and the items they contain. To cover a whole project, create the webhook on the project’s root folder URN.
Retrieve it with the Data Management GET operations. For example, GET projects/:project_id/folders/:folder_id returns the folder, and the URN is its id:
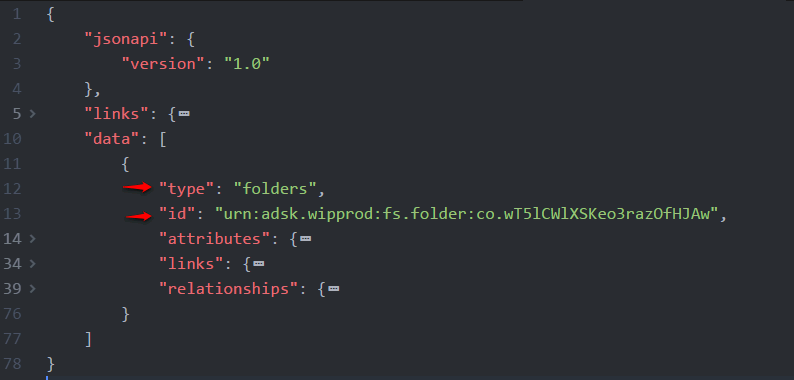
To subscribe at project level, use the project’s root folder URN.
Step 3: Prepare the Callback
The Webhooks service delivers each notification as an HTTP POST request to your callback URL. The URL must be reachable from the internet and must acknowledge the request quickly.
See Configuring Your Server for what your callback has to do and how to expose a local server while developing.
Step 4: Create the Webhook
Create the webhook before the change you want to hear about happens. A webhook receives only events that occur while it can deliver, so it does not receive events from before it existed.
Create the webhook by calling POST systems/:system/events/:event/hooks.
Set callbackUrl to the callback URL you prepared in Step 3, and set scope.folder to the folder URN you found in Step 2.
Two optional properties are useful in some workflows:
hookAttributecarries a JSON object of your own back to you in every callback. Use it for context the payload does not include, such as your own record ID. See the Webhooks Field Guide.filternarrows which callbacks you receive by testing the payload, for example receiving callbacks only for one file extension. See Callback Filtering.
Data Management webhooks also accept hubId and projectId request parameters, which identify the hub and project containing the entity you are monitoring. Specify them if the user calling the operation is a member of a large number of projects. Note that BIM 360 and Forma IDs differ from Data Management IDs: prefix the ID with b. to convert it, so a Project ID of c8b0c73d-3ae9 becomes b.c8b0c73d-3ae9.
If your data is not in the default US region, specify the relevant region when making the request. For more information, see Regionalization and Data Residency.
If the request returns 401 or 403, confirm you have access to the folder and its project, in addition to the checks in Authentication for Webhooks.
If the request returns 400, confirm you are using folder as the scope name, and that the value is a folder URN rather than a project, item, or version ID. Folder is the only supported scope for Data Management events.
Request
curl -X 'POST' \
     -v 'https://developer.api.autodesk.com/webhooks/v1/systems/data/events/dm.version.added/hooks' \
     -H 'Content-Type: application/json' \
     -H 'authorization: Bearer <ACCESS_TOKEN>' \
     -d '{
           "callbackUrl": "https://myapp.example.com/callback",
           "scope": {
             "folder": "urn:adsk.wipprod:fs.folder:co.wT5lCWlXSKeo3razOfHJAw"
           }
         }'
Response
A successful request returns 201 with an empty body and a Location header (or location if your connection uses HTTP/2):
HTTP/1.1 201
Location: https://developer.api.autodesk.com/webhooks/v1/systems/data/events/dm.version.added/hooks/0f60f6a0-996c-11e7-abf3-51d68cff984c
Content-Length: 0
Note the Location value (returned as location if your connection uses HTTP/2). Its final path segment is the hookId. You can use the hookId together with the system and event to retrieve, update, or delete the webhook.
If the request returns 401 or 403, check your access token, its type, and its scopes, and confirm you have access to the folder and its project. See Authentication for Webhooks.
If the request returns 400, verify that:
folderis specified as the scope name.- The scope value is a folder URN, rather than a project, item, or version ID.
If the request returns 409, a webhook already exists for the same callback URL, scope, and event. Retrieve your existing webhooks before creating another.
If the request returns 429, you have exceeded a rate limit. Wait, then retry. See Rate Limits and Quotas.
Step 5: Verify the Webhook
Confirm the webhook exists and is configured as intended by retrieving your webhooks.
Request
curl -v 'https://developer.api.autodesk.com/webhooks/v1/hooks' \
     -H 'authorization: Bearer <ACCESS_TOKEN>'
Response
The response contains the webhooks visible to the access token holder.
In the response, find the webhook you created and verify that:
statusisactive.systemisdataandeventisdm.version.added.scopeholds the folder URN from Step 2.callbackUrlis the URL you prepared in Step 3.
For more information about retrieving webhooks, see Retrieve a List of Webhooks.
If the webhook does not appear in the response, verify that you are retrieving webhooks from the same region in which it was created. See Regionalization and Data Residency.
For more information about webhook status and diagnosing delivery problems, see Monitoring and Troubleshooting.
Step 6: Test the Webhook
The flow you are testing is:
Data Management action → event occurs → Webhooks notification → your callback receives the payload
To trigger dm.version.added, add a new version of an item to the folder you scoped the webhook to, or to any folder inside it, since scope is recursive. You can do this in the Autodesk product or through the Data Management API.
Your callback URL then receives a POST request. The body looks like this, abridged:
{
  "version": "1.0",
  "resourceUrn": "urn:adsk.wipprod:fs.file:vf.0zvdp3CoTzWDcZC_wL0kJA?version=1",
  "hook": {
    "system": "data",
    "event": "dm.version.added",
    "hookId": "1fcd3e30-9f3f-11e7-951f-0fd5337ed5ce",
    "scope": {
      "folder": "urn:adsk.wipprod:fs.folder:co.wT5lCWlXSKeo3razOfHJAw"
    }
  },
  "payload": {
    "ext": "txt",
    "name": "notes.txt",
    "version": "1",
    "lineageUrn": "urn:adsk.wipprod:dm.lineage:0zvdp3CoTzWDcZC_wL0kJA"
  }
}
To confirm success, check that hook.hookId matches the webhook you created and that hook.scope.folder is your folder. The payload field describes what changed. For the complete body and the headers that accompany it, see dm.version.added.
If the callback does not arrive, confirm that the webhook was active when the change occurred, that the change was made in the scoped folder or one of its subfolders, and that your callback URL is reachable from the internet and acknowledges the request quickly. See Configuring Your Server.
For more information about diagnosing callback delivery problems, see Monitoring and Troubleshooting.
If the Data Management behavior itself is unexpected, see the Data Management documentation.
Step 7: Verify Callback Authenticity
Your callback URL is reachable by anyone, so verify that a callback genuinely came from the Webhooks service before acting on it.
The access token and the secret token serve different purposes:
- The access token authorizes the calls your app makes to create and manage webhooks.
- The secret token you set is used to sign each callback, so your server can check it.
The access token is not sent with the callback.