Reacting to Events
Events are a mechanism to notify 3rd party code about changes in the Viewer. The Viewer actually listens to its own events in order to update the UI state. See the Viewing Namespace topic of the API Reference for a list of available events.
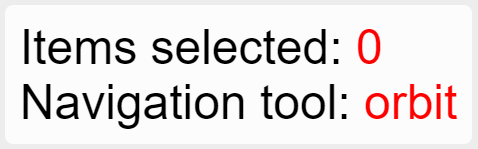
This topic demonstrates adding listeners for the Autodesk.Viewing.SELECTION_CHANGED_EVENT and
Autodesk.Viewing.NAVIGATION_MODE_CHANGED_EVENT. We will change the HTML content to
display how many elements are currently selected and what navigation tool is currently set.
Before You Begin
We recommend the code in this example to be encapsulated in an extension.
Step 1: Add Selection Counter to HTML
Let’s begin by adding an HTML element that displays how many nodes are currently selected.
Add the HTML block after the Viewer’s div.
<div class="my-custom-ui">
    <div>Items selected: <span id="MySelectionValue">0</span></div>
<div>
Add the following style.
<style>
   .my-custom-ui {
        position: absolute;
        top: 0;
        left: 0;
        z-index: 5;
        margin: .3em;
        padding: .3em;
        font-size: 3em;
        font-family: sans-serif;
        background-color: rgba(255, 255, 255, 0.85);
        border-radius: 8px;
    }
    .my-custom-ui span {
        color: red;
    }
</style>
The content of #MySelectionValue changes whenever Autodesk.Viewing.SELECTION_CHANGED_EVENT gets fired.
Step 2: Listen and react to an event
Events are dispatched through the Viewer3D instance.
Let’s now add a function to handle selection change events.
We will also call addEventListener() on the extension’s load() function and call removeEventListener() on the extensions’s unload() function.
// Event handler for Autodesk.Viewing.SELECTION_CHANGED_EVENT
EventsTutorial.prototype.onSelectionEvent = function(event) {
    var currSelection = this.viewer.getSelection();
    var domElem = document.getElementById('MySelectionValue');
    domElem.innerText = currSelection.length;
};

EventsTutorial.prototype.load = function() {
    this.onSelectionBinded = this.onSelectionEvent.bind(this);
    this.viewer.addEventListener(Autodesk.Viewing.SELECTION_CHANGED_EVENT, this.onSelectionBinded);
    return true;
};

EventsTutorial.prototype.unload = function() {
    this.viewer.removeEventListener(Autodesk.Viewing.SELECTION_CHANGED_EVENT, this.onSelectionBinded);
    this.onSelectionBinded = null;
    return true;
};
We use bind() to keep a reference to this within onSelectionEvent().
At this point, every time a node gets selected the counter will change to that number.
Remove the selection by using ESC on your keyboard. You select additional nodes by using Shift-Click or Ctrl-Click.
Notice that you can also toggle the selection with those commands.
Step 3: Another event
The Viewer’s toolbar features buttons that change the current navigation tool. Tools are responsible for converting user input into actions. The Navigation tools in particular deal with navigating the camera around the scene.
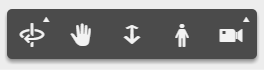
Let’s now listen to Autodesk.Viewing.NAVIGATION_MODE_CHANGED_EVENT and display the tool’s name onscreen.
Start by modifying the initially added HTML as follows.
<div class="my-custom-ui">
  <div>Items selected: <span id="MySelectionValue">0</span></div>
  <div>Navigation tool: <span id="MyToolValue">Unknown</span></div>
<div>
We also need to add the event handler and modify load() and unload() methods.
// New event for handling Autodesk.Viewing.NAVIGATION_MODE_CHANGED_EVENT
// Follows a similar pattern
EventsTutorial.prototype.onNavigationModeEvent = function(event) {
    var domElem = document.getElementById('MyToolValue');
    domElem.innerText = event.id;
};

EventsTutorial.prototype.load = function() {
    this.onSelectionBinded = this.onSelectionEvent.bind(this);
    this.onNavigationModeBinded = this.onNavigationModeEvent.bind(this);
    this.viewer.addEventListener(Autodesk.Viewing.SELECTION_CHANGED_EVENT, this.onSelectionBinded);
    this.viewer.addEventListener(Autodesk.Viewing.NAVIGATION_MODE_CHANGED_EVENT, this.onNavigationModeBinded);
    return true;
};

EventsTutorial.prototype.unload = function() {
    this.viewer.removeEventListener(Autodesk.Viewing.SELECTION_CHANGED_EVENT, this.onSelectionBinded);
    this.viewer.removeEventListener(Autodesk.Viewing.NAVIGATION_MODE_CHANGED_EVENT, this.onNavigationModeBinded);
    this.onSelectionBinded = null;
    this.onNavigationModeBinded = null;
    return true;
};
Notice that for this new event, we are actually consuming the id property and assigning it as the innerText.
Most of the events dispatched have associated data with them. The same data can be pulled from the Viewer instance as well.
The same id value can be fetched from the viewer by calling this.viewer.getActiveNavigationTool().
// Alternative handler for Autodesk.Viewing.NAVIGATION_MODE_CHANGED_EVENT
EventsTutorial.prototype.onNavigationModeEvent = function(event) {
    var domElem = document.getElementById('MyToolValue');
    domElem.innerText = this.viewer.getActiveNavigationTool(); // same value as event.id
};
Now that the event is hooked, try clicking through the navigation buttons in the Viewer’s toolbar. You’ll find that the event handler will pick up the tool change event!