Geometry placement
When you place geometry in Forma, you need to understand how coordinate systems work together. This guide walks you through the fundamentals with practical examples.
Coordinate systems
Forma uses a projected coordinate system where all coordinates are specified in
metres. Each site has a coordinate system defined by an SRID (spatial reference
identifier) and a reference point that maps to a WGS84 location. You can retrieve
this information using the Site API
or the SDK’s Forma.project.get() method.
Every scene in Forma has an origin point at coordinates (0, 0, 0). All geometry in the scene is positioned relative to this origin. Coordinates in this global coordinate system are called scene coordinates or world coordinates.
Typically, the centre of the terrain is located at (0, 0), although this is not an absolute rule. The z-coordinate represents metres above mean sea level, so z = 0 is often below the terrain surface.
Similarly, every object (such as a 3D model) has its own local coordinate system with its own origin. The geometry within that object is defined relative to this local origin, using local coordinates.
When you place an object in the scene, you specify a transform that positions the object’s local origin relative to the scene origin. This is where understanding the relationship between these coordinate systems becomes important.
Example: Placing a tree
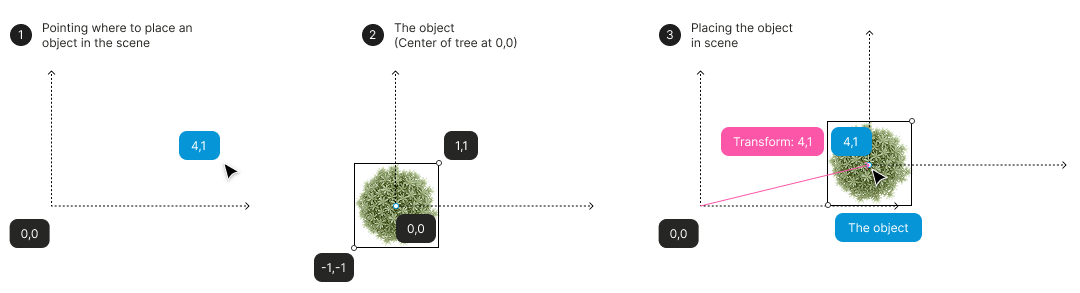
Imagine you want to place a tree at position (4, 1) in the scene, with the tree trunk at that exact point.
Case 1: Object centered at its local origin
If the tree model is designed with its trunk at local coordinates (0, 0), placing it is straightforward. Setting the transform to (4, 1) moves the object’s local origin to (4, 1) in the scene—and since the trunk is at (0, 0) locally, it ends up exactly where you want it:
Case 2: Object offset from its local origin
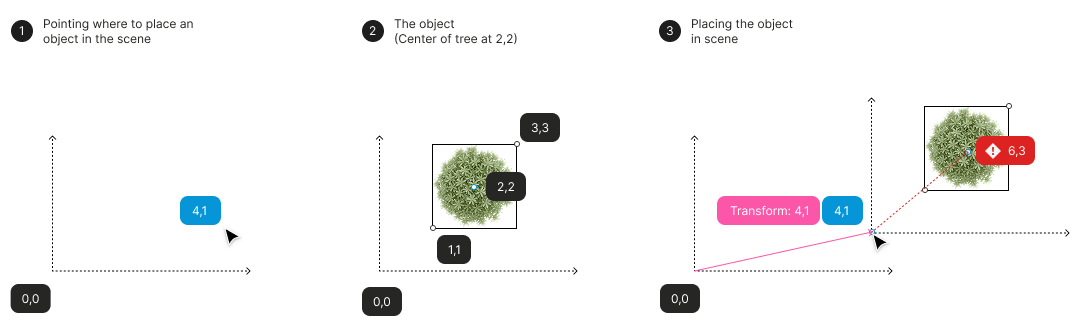
Now consider a tree model where the trunk is at local coordinates (2, 2) instead of (0, 0). If you apply the same transform of (4, 1), the object’s local origin moves to (4, 1), but the trunk ends up at (6, 3)—not where you intended:
Correcting the offset
To place this offset tree correctly, you need to compensate for the local offset. Since the trunk is at (2, 2) in local coordinates, subtract this offset from your desired position: (4, 1) − (2, 2) = (2, −1). Using a transform of (2, −1) places the trunk at (4, 1):
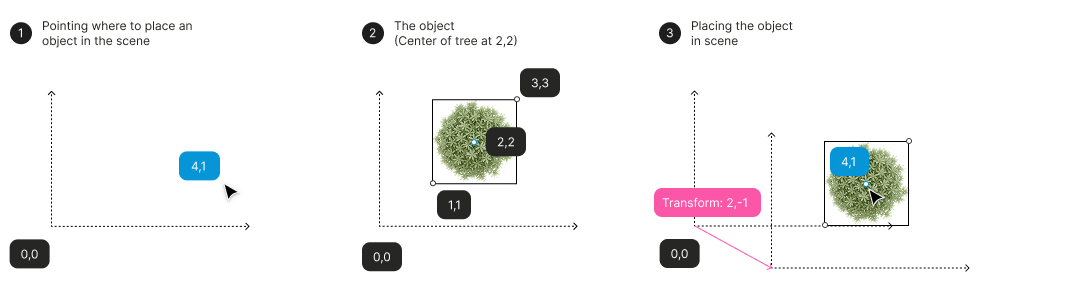
The key insight: always consider where your point of interest lies within the object’s local coordinate system, then adjust your transform accordingly.
Element hierarchies
In Forma, geometry objects (such as GLB files) are attached to elements. Elements can contain other elements, forming a hierarchical structure. Each child element has a transform that positions it relative to its parent element.
For example, a parent element (Element G) might contain three child elements (A, B, and C), each with its own transform defining its position within the group:
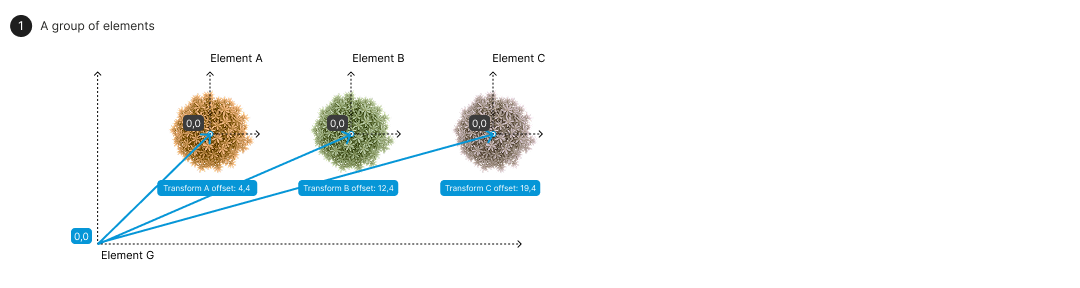
When you place Element G in the scene, the parent’s transform positions the entire group relative to the scene origin. Each child’s final position in the scene is the combination of the parent’s transform and the child’s own transform:
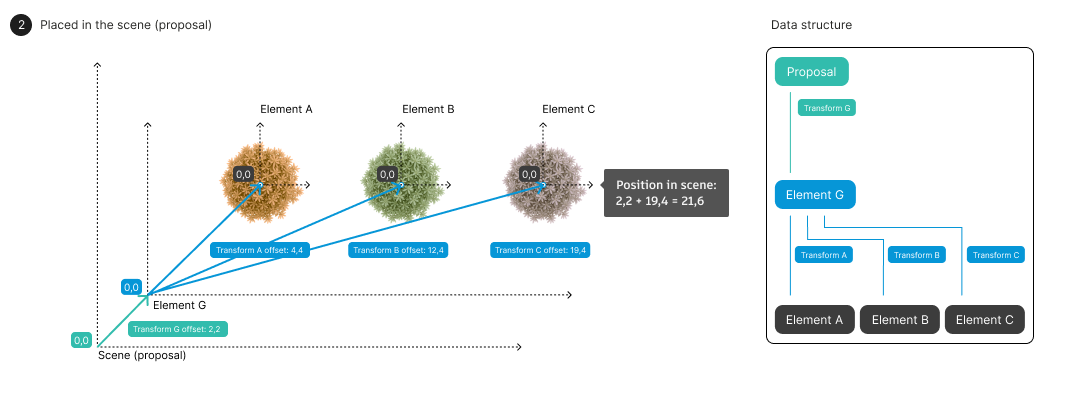
Calculating world transforms
An element’s world transform describes its position in scene coordinates. To calculate this, combine all transforms in the element’s hierarchy by multiplying the transformation matrices from the root element down to the target element.
Using the example above, Element A’s world transform is the result of multiplying Transform G × Transform A. This gives you Element A’s position in scene coordinates, accounting for the entire hierarchy.
For more details on element hierarchies and rendering, see Element hierarchies and rendering.
Embedded View SDK
The Embedded View SDK provides functions for working with geometry placement in the Forma viewer.
Getting an element’s world transform
The getWorldTransform function calculates an element’s complete transform
through the hierarchy, returning the combined transformation matrix as described
above.
Rendering GLB directly in the scene
Instead of attaching geometry to elements, you can render a GLB file directly in the scene using the Render GLB API.
Important: When you render a GLB directly, no transform is applied—the geometry appears exactly as defined in its local coordinate system, positioned at the scene origin point.
This is a common source of confusion: if you retrieve an element’s geometry and render it directly, the GLB will appear at the scene origin point rather than at the element’s position. To render the GLB at the correct location, you must apply the element’s world transform yourself.
For details on working with GLB files, including the Y-up to Z-up coordinate conversion required for Forma, see the volumeMesh representation.
Transformation matrices
Transforms in Forma are represented as a flat array of 16 numbers encoding a column-major 4×4 affine transformation matrix. Translation values are specified in metres.
For detailed information on transformation matrices, including mathematical notation and examples of common transformations (translation, rotation, scaling), see the FormaElement specification.
Georeferencing
Forma sites are typically georeferenced. You can retrieve the latitude and
longitude of the site’s origin point in the WGS84 coordinate system using the
SDK’s Forma.project.getGeoLocation() method.
This georeference defines where the scene’s origin point (0, 0) is located in the real world, allowing you to convert between local scene coordinates and geographic coordinates.