Customizing Exchange Creation/Loading
Introduction to Custom Forms
Custom forms augment the Connector UI by adding additional options for exchange creation and loading, capturing user input to fine-tune exchange parameters and behaviors. Refer to the CustomFormId class for scenarios in which specific custom forms may be requested.
Pre-requisites
CustomFormFactoryBaseCustomFormFactoryAdvancedCreateFormBaseCustomFormAdvancedLoadForm
Custom Form Factory
Defines the factory interface for creating custom forms used to augment the Connector UI. This interface is provided to the InteropBridgeFactory.Create API during the initialization of the Connector UI.
public class CustomFormFactory : BaseCustomFormFactory
{
    protected override Task<ICustomForm> CreateCore(string formId)
    {
        switch (formId)
        {
            case CustomFormId.AdvancedCreateOptions:
                return Task.FromResult<ICustomForm>(new AdvancedCreateForm(formId));
            case CustomFormId.AdvancedLoadOptions:
                return Task.FromResult<ICustomForm>(new AdvancedLoadForm(formId));
            default:
                return Task.FromResult<ICustomForm>(null);
        }
    }
}

// Create and register the custom form while instantiating the interop bridge
var customFormFactory = new CustomFormFactory();
bridgeOptions.CustomFormFactory = customFormFactory;

var bridge = InteropBridgeFactory.Create(bridgeOptions);
Working with Platform Attributes
Platform attributes provide metadata about exchanges, enabling filtering, tracking, and display of authoring information in the FDX Connector UI. The SDK automatically captures key information about exchange creation (which connector and host application were used, and their versions), making it easier to troubleshoot issues and track exchange origins without requiring manual effort from developers.
Automatic SDK Metadata
The SDK automatically adds four metadata attributes to every exchange you create:
| Attribute | Source | Example Value |
|---|---|---|
ConnectorName |
SDKOptions.ConnectorName |
"Revit Connector" |
ConnectorVersion |
SDKOptions.ConnectorVersion |
"7.1.0" |
SourceApplicationName |
SDKOptions.HostApplicationName |
"Revit" |
SourceApplicationVersion |
SDKOptions.HostApplicationVersion |
"2025" |
These attributes are automatically displayed in the Exchange Details panel:
- Authoring Connector: Shows
ConnectorNameandConnectorVersion - Authoring App: Shows
SourceApplicationNameandSourceApplicationVersion
You don’t need to set these manually - they’re populated from your SDKOptions configuration.
Adding Custom Attributes
Use the PlatformAttributes property to add custom attributes for filtering or tracking:
var client = new Client(sdkOptions);

// Add custom platform attributes
// These will be merged with the automatic SDK metadata
// WARNING: Do NOT use reserved keys (ConnectorName, ConnectorVersion,
// SourceApplicationName, SourceApplicationVersion) - they will throw an exception
client.PlatformAttributes = () => new Dictionary<string, string>
{
    { "Department", "Structural Engineering" },
    { "ProjectPhase", "Design Development" },
    { "CostCenter", "CC-2024-001" },
    { "Region", "North America" }
};
How Attributes Are Merged
The SDK applies attributes in priority order: SDK Metadata (lowest) → PlatformAttributes → Request.Attributes (highest priority wins).
When you create an exchange, attributes are combined in this order:
- SDK Metadata (base layer) - Automatically added from
SDKOptionsConnectorName, ConnectorVersion, SourceApplicationName, SourceApplicationVersion - PlatformAttributes (your custom attributes) - Merged with SDK metadata
Department, ProjectPhase, CostCenter, Region, etc. - ExchangeCreateRequest.Attributes (per-exchange attributes) - For exchange-specific metadata
SDK Metadata Keys
You can override SDK metadata if needed (though typically not recommended):
ConnectorNameConnectorVersionSourceApplicationNameSourceApplicationVersion
To customize connector metadata, configure SDKOptions during initialization:
var sdkOptions = new SDKOptions
{
    ConnectorName = "My Custom Connector",
    ConnectorVersion = "1.0.0",
    HostApplicationName = "Revit",
    HostApplicationVersion = "2025",
    // ... other options
};

var client = new Client(sdkOptions);
Attribute Categories and Filtering
SDK Metadata Attributes:
- Automatically excluded from the “Filters applied” section in the UI
- Displayed in dedicated “Authoring Connector” and “Authoring App” fields
- Reserved keys that cannot be used in
PlatformAttributes(will throw an exception):ConnectorNameConnectorVersionSourceApplicationNameSourceApplicationVersion
Custom Filter Attributes:
- Displayed in the “Filters applied” section
- Can be used for user-based filtering and organization
- Any attribute key not matching SDK metadata reserved keys
Best Practices
DO:
- Use
PlatformAttributesfor custom metadata that helps users organize and filter exchanges - Use meaningful attribute names (e.g., “Department”, “ProjectPhase”, “Region”)
- Keep attribute values concise for better UI display
- Use
PlatformAttributesfor attributes shared across all exchanges - Use
ExchangeCreateRequest.Attributesfor per-exchange specific metadata
DON’T:
- Don’t use reserved SDK metadata keys (
ConnectorName,ConnectorVersion,SourceApplicationName,SourceApplicationVersion) - they will throw an exception - Don’t include sensitive information in platform attributes:
- Personal information (names, email addresses, phone numbers)
- Credentials (passwords, API keys, tokens, certificates)
- Internal system data (server names, database connections, file paths)
- Reason: Attributes are visible in the UI and stored unencrypted in exchanges
Complete Example
public class ConnectorManager
{
    private Client client;

    public void InitializeSDK()
    {
        var sdkOptions = new SDKOptions
        {
            ConnectorName = "My Revit Connector",
            ConnectorVersion = "1.0.0",
            HostApplicationName = "Revit",
            HostApplicationVersion = "2025",
            // ... other options
        };

        client = new Client(sdkOptions);

        // Add custom attributes for filtering and organization
        // Do NOT use reserved keys: ConnectorName, ConnectorVersion,
        // SourceApplicationName, SourceApplicationVersion (will throw exception)
        client.PlatformAttributes = GetPlatformAttributes;
    }

    private Dictionary<string, string> GetPlatformAttributes()
    {
        return new Dictionary<string, string>
        {
            { "Department", GetCurrentDepartment() },
            { "ProjectPhase", GetCurrentPhase() },
            { "Region", GetCurrentRegion() },
            { "BuildNumber", GetBuildNumber() }
        };
    }

    private string GetCurrentDepartment()
    {
        // Your logic to determine department
        return "Structural Engineering";
    }

    private string GetCurrentPhase()
    {
        // Your logic to determine project phase
        return "Construction Documents";
    }

    private string GetCurrentRegion()
    {
        // Your logic to determine region
        return "North America";
    }

    private string GetBuildNumber()
    {
        return Assembly.GetExecutingAssembly()
            .GetName()
            .Version
            .ToString();
    }
}
Exchange Details Display
When a user selects an exchange in the Connector UI, the Exchange Details panel displays:
System Information:
- Created by: User who created the exchange
- Updated by: User who last modified the exchange
- Last updated: Timestamp of last modification
Authoring Information (from SDK metadata):
- Authoring Connector: “My Revit Connector, 1.0.0”
- Authoring App: “Revit, 2025”
Custom Filters (from your PlatformAttributes):
- Filters applied: “Structural Engineering, Construction Documents, john.smith, 1.0.0.0”
Project Information:
- Project: Project name
- Folder: Folder path
Working with Exchange Descriptions
Exchange descriptions let users document what changed in an exchange — similar to commit messages in version control. They appear in the Create and Update modals, and surface in the version history tooltip so team members can understand the evolution of an exchange without opening it.
The Connector UI captures descriptions automatically. You don’t need to add any UI code — but you do need to handle the values in your connector logic if you want to use them.
| Where it appears | Property | Required? |
|---|---|---|
| Create Exchange modal | exchange.ExchangeDescription in CreateExchangeAsync |
No |
| Update Exchange modal | exchangeItem.Description in UpdateExchangeAsync |
No |
| Version history tooltip | Displayed automatically | — |
For programmatic access without the UI, see Working with Exchange Descriptions.
Reading the Description on Create
When a user creates an exchange and enters a description, it is available in your CreateExchangeAsync override as exchange.ExchangeDescription. The field is optional — always check for null or empty before using it.
public override async Task CreateExchangeAsync(
    ExchangeCreationData exchange,
    CancellationToken cancellationToken = default)
{
    // Description is optional — user may leave it blank
    var description = exchange.ExchangeDescription;

    if (!string.IsNullOrWhiteSpace(description))
    {
        // Log it, annotate the host model, send to analytics, etc.
        logger.Info($"Exchange created with description: {description}");
        hostApp.AnnotateModel(exchange.ExchangeId, description);
    }

    await base.CreateExchangeAsync(exchange, cancellationToken);
}
Example user inputs:
- “Initial design model for client presentation”
- “Baseline structural model from architect”
- “Phase 1 construction documents”
Reading the Description on Update
When a user updates an exchange and enters a description in the “Describe what changed” field, it is available as exchangeItem.Description in your UpdateExchangeAsync override.
To persist the description to the exchange, assign it to ElementDataModel.Description before calling SyncExchangeDataAsync. If you skip this step, the description may not appear in the version history.
public override async Task UpdateExchangeAsync(
    ExchangeItem exchangeItem,
    CancellationToken cancellationToken = default)
{
    var currentElementDataModel = ElementDataModel.Create(this.Client);

    // Assign the description before syncing — required for it to appear in version history
    currentElementDataModel.Description = exchangeItem.Description;

    await this.Client.SyncExchangeDataAsync(currentElementDataModel, cancellationToken);

    await base.UpdateExchangeAsync(exchangeItem, cancellationToken);
}
Example user inputs:
- “Updated HVAC duct sizes per mechanical engineer feedback”
- “Added fire egress doors to meet code requirements”
- “Revised grid lines per structural coordination”
Description in Version History
Descriptions appear in the Connector UI when hovering over version chips in the exchange list. Instead of seeing just a version number, users see the description explaining what changed in that version.
This makes it easy to:
- Identify specific versions without opening them
- Understand the evolution of the exchange
- Track changes across team members
Retrieving Descriptions Programmatically
To read descriptions from exchange history without the UI:
var revisionsResponse = await client.GetExchangeRevisionsAsync(exchangeIdentifier);
foreach (var revision in revisionsResponse.Value)
{
    Console.WriteLine($"Version: {revision.Id}");
    Console.WriteLine($"Description: {revision.Description}");
}
For setting descriptions programmatically (without the UI), see Working with Exchange Descriptions.
Best Practices for Descriptions
DO:
- Write clear, concise descriptions explaining what changed
- Mention the reason for changes when relevant
- Reference design phases, milestones, or coordination efforts
- Keep descriptions under 200 characters for better UI display (update revision notes accept up to 500 characters, but shorter is easier to scan in the version tooltip)
- Handle null or empty descriptions gracefully — the field is always optional
DON’T:
- Assume the description is always populated — always null-check before using it
- Include sensitive information
- Write overly technical jargon that team members won’t understand
- Use descriptions as a replacement for proper element naming
Troubleshooting Platform Attributes
Exception: Reserved Attribute Key
Error Message:
ArgumentException: Cannot use reserved attribute key 'ConnectorName' in PlatformAttributes
Cause: You attempted to use a reserved SDK metadata key in PlatformAttributes.
Reserved Keys:
ConnectorNameConnectorVersionSourceApplicationNameSourceApplicationVersion
Solution: Remove the reserved key from PlatformAttributes and configure it in SDKOptions instead:
// WRONG - will throw exception
client.PlatformAttributes = () => new Dictionary<string, string>
{
    { "ConnectorName", "My Custom Name" }  // Exception!
};

// CORRECT - configure in SDKOptions
var sdkOptions = new SDKOptions
{
    ConnectorName = "My Custom Name",
    ConnectorVersion = "1.0.0",
    // ... other options
};
Attributes Not Showing in UI
Problem: Custom attributes don’t appear in the “Filters applied” section.
Possible Causes:
- Attribute key matches a reserved SDK metadata key (displayed in “Authoring Connector” or “Authoring App” instead)
PlatformAttributesfunction not set or returning null/empty dictionary- Exchange was created before setting
PlatformAttributes
Solution: Verify your attribute keys don’t match reserved keys and that PlatformAttributes is set before creating exchanges.
Input Descriptors
Input descriptors define the structure and behavior of form elements:
ITextFieldDescriptor: For text inputICheckboxDescriptor: For boolean optionsISelectorDescriptor: For dropdown or multi-select fieldsIAlertDescriptor: For displaying messages or warningsIImageViewerDescriptor: For displaying images
Common Properties
All input descriptor types share the following base properties:
| Property | Type | Default | Description |
|---|---|---|---|
Id |
string |
— | Unique identifier for the input |
Title |
string |
— | Display label shown above the field |
Description |
string |
— | Helper text shown below the field |
Tooltip |
string |
— | Text shown on hover |
Required |
bool |
false |
Marks the field as required |
Disabled |
bool |
false |
Prevents interaction with the field |
ReadOnly |
bool |
false |
Displays the field as read-only |
GutterBottom |
bool |
false |
Adds extra spacing below the field |
IsBeta |
bool |
false |
Renders a Beta badge next to the field title |
Marking a Field as Beta
Set IsBeta = true on any descriptor to display a Beta badge next to the field’s title — useful for fields that expose experimental or early-access options, where behavior may change in a future release.
When to use:
- A specific option (not the whole connector) is experimental
- The field exposes a new algorithm, format, or feature under active development
- You want to warn users that this field’s output may change
When NOT to use:
- The feature is stable, even if it’s newly added
- The entire connector is in beta — use
ShowTitleBarBetaBadgeonFeatureCapabilitiesinstead
// Good: mark a specific experimental option
new TextFieldDescriptor("exportFormat")
{
    Title = "Export Format",
    Description = "This format is experimental and may change in future versions.",
    IsBeta = true
}

// Avoid: IsBeta without a Description leaves users without context
new TextFieldDescriptor("exportFormat")
{
    Title = "Export Format",
    IsBeta = true  // user sees badge but doesn't know what "beta" means here
}
Creating Custom Forms
Custom forms should derive from BaseCustomForm, which provides default behavior for form lifecycle handling.
public class AdvancedCreateForm : BaseCustomForm
{
    private string authorsName = "unknown";

    public AdvancedCreateForm(string formId) : base(formId) { }

    public override bool IsReadyToCommit => this.authorsName != "unknown";

    protected override Task<IEnumerable<IInputDescriptor>> GetInputFieldsCoreAsync(bool invalidation)
    {
        var descriptors = new List<IInputDescriptor>();
        return Task.FromResult<IEnumerable<IInputDescriptor>>(descriptors);
    }

    protected override Task<bool> HandleInputUpdatedCoreAsync(IInputDescriptor descriptor)
    {
        return Task.FromResult(true);
    }

    protected override Task<CustomInputContent> GetInputContentCoreAsync(string inputId)
    {
        return Task.FromResult<CustomInputContent>(null);
    }

    protected override Task HandleFormSubmissionCoreAsync(bool commit)
    {
        return Task.CompletedTask;
    }
}
Define Input Fields on Custom Form
protected override Task<IEnumerable<IInputDescriptor>> GetInputFieldsCoreAsync(bool invalidation)
{
    var descriptors = new List<IInputDescriptor>
    {
        new TextFieldDescriptor("authorsNameField")
        {
            Title = "Author's Name",
            Required = true,
            Value = this.authorsName,
        }
    };

    return Task.FromResult<IEnumerable<IInputDescriptor>>(descriptors);
}
Grouping Dropdown Options
Organize dropdown options into groups with category headers and visual separators. Grouping improves usability when users need to select from long lists of categorized items.
Example: Grouped dropdown in a Revit connector
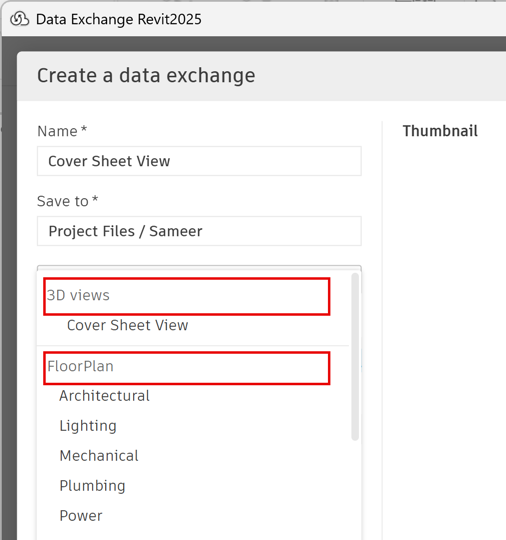
Figure: A Revit connector dropdown organizing project views using the Group property. Views are grouped by type: “3D views” contains 3D perspective views, while “FloorPlan” contains floor plans organized by discipline (Architectural, Lighting, Mechanical, Plumbing, Power).
Implementation:
Set the Group property on LabeledOption within an ISelectorDescriptor to organize options into categories:
protected override Task<IEnumerable<IInputDescriptor>> GetInputFieldsCoreAsync(bool invalidation)
{
    var descriptors = new List<IInputDescriptor>
    {
        new SelectorDescriptor("viewSelector")
        {
            Title = "Select Views",
            Multiple = true,
            Options = new List<LabeledOption>
            {
                // 3D views group
                new() { Label = "Cover Sheet View", Value = "view_3d_coversheet", Group = "3D views" },

                // Floor plan views grouped by discipline
                new() { Label = "Architectural", Value = "view_fp_arch", Group = "FloorPlan" },
                new() { Label = "Lighting", Value = "view_fp_lighting", Group = "FloorPlan" },
                new() { Label = "Mechanical", Value = "view_fp_mech", Group = "FloorPlan" },
                new() { Label = "Plumbing", Value = "view_fp_plumb", Group = "FloorPlan" },
                new() { Label = "Power", Value = "view_fp_power", Group = "FloorPlan" }
            }
        }
    };

    return Task.FromResult<IEnumerable<IInputDescriptor>>(descriptors);
}
Use cases:
- Dropdowns with large numbers of options
- Data organized by category (element types, families, views, layers)
- Selections where categorization aids navigation
Note: The Group property is optional. Options without a group value display in a standard dropdown format.
Input Validation and Dynamic Updates
protected override Task<bool> HandleInputUpdatedCoreAsync(IInputDescriptor descriptor)
{
    if (descriptor.Id == "authorsNameField")
    {
        this.authorsName = ((TextFieldDescriptor)descriptor).Value;
    }
    return Task.FromResult(true);
}
Form Submission Readiness
public override bool IsReadyToCommit
{
    get
    {
        if (string.IsNullOrEmpty(this.authorsName))
        {
            return false;
        }
        return this.authorsName != "unknown";
    }
}
Handle Form Submission
protected override Task HandleFormSubmissionCoreAsync(bool commit)
{
    if (commit)
    {
        yourAppDataModel.SetAuthorName(this.authorName);
    }
    return Task.CompletedTask;
}
Advanced Customization: Binary Data
protected override Task<CustomInputContent> GetInputContentCoreAsync(string inputId)
{
    if (inputId == "projectThumbnail")
    {
        byte[] imageBytes = LoadThumbnailPngData();
        return Task.FromResult(new CustomInputContent(MimeType.Png, imageBytes));
    }
    return Task.FromResult(new CustomInputContent(MimeType.Null, null));
}
Host Data Provider Interface
public interface IHostDataProvider
{
    Task<string> GetExchangeNameAsync();
    Task<ConnectorVersionInfo> GetLatestConnectorVersionAsync();
    Task ExchangeSelectionChangedEventAsync(IEnumerable<string> exchangeIds);
}
GetExchangeNameAsync
public async Task<string> GetExchangeNameAsync()
{
    var documentName = GetCurrentDocumentName();
    return await Task.FromResult($"Exchange for {documentName}");
}
GetLatestConnectorVersionAsync
public async Task<ConnectorVersionInfo> GetLatestConnectorVersionAsync()
{
    try
    {
        var latestVersion = await CheckCustomUpdateServer();
        if (latestVersion != null)
        {
            return new ConnectorVersionInfo
            {
                Name = "MyCustomConnector",
                Version = latestVersion.Version,
                DownloadUrl = latestVersion.DownloadUrl,
            };
        }
    }
    catch (Exception ex)
    {
        LogError($"Failed to check for updates: {ex.Message}");
    }
    return null;
}
Context-Aware Load Forms
The Problem
When a user selects an exchange in the Connector UI and opens the Load form, your form typically has no information about which exchange was selected. It renders the same static set of options for every exchange, regardless of where the exchange came from or which connector authored it.
This becomes a limitation as soon as your connector needs to do anything conditional during load. For example:
- A Navisworks connector wants to offer a “Load at Survey Point” option only when the exchange was authored by the Revit connector. For all other authoring connectors, that option is irrelevant and should not appear.
- A connector wants to display a compatibility warning when the exchange was created with a different version of the host application.
- A connector needs to select a default category mapping based on the authoring connector’s identity.
Without knowing which exchange is selected, none of these scenarios are possible in the Load form.
How Exchange Context Works
IExchangeContextForm is an opt-in interface that Load forms implement to receive exchange metadata before rendering their fields.
When the bridge creates a form and detects that it implements IExchangeContextForm, it calls ApplyExchangeContext once, passing the application-category attributes from the selected exchange. This happens before GetInputFieldsAsync is called, so by the time your form builds its field list, it already has the exchange data it needs.
The call sequence is:
CreateAsync(formId)
    -> ApplyExchangeContext(exchangeAttributes)   [only if form implements IExchangeContextForm]
        -> GetInputFieldsAsync(false)
Forms that do not implement IExchangeContextForm are unaffected. The bridge skips context propagation entirely for them.
Implementing IExchangeContextForm
Add IExchangeContextForm to your Load form’s class declaration alongside BaseCustomForm:
using Autodesk.DataExchange.UI.CustomForm.Interfaces;

public class AdvancedLoadForm : BaseCustomForm, IExchangeContextForm
{
    private string connectorName = string.Empty;
    private string connectorVersion = string.Empty;
    private string sourceApplicationName = string.Empty;
    private string sourceApplicationVersion = string.Empty;
    private bool contextApplied;

    public AdvancedLoadForm(string formId) : base(formId) { }

    public override bool IsReadyToCommit => true;

    public void ApplyExchangeContext(IReadOnlyDictionary<string, string> exchangeAttributes)
    {
        this.contextApplied = true;
        this.connectorName = GetValue(exchangeAttributes, "ConnectorName");
        this.connectorVersion = GetValue(exchangeAttributes, "ConnectorVersion");
        this.sourceApplicationName = GetValue(exchangeAttributes, "SourceApplicationName");
        this.sourceApplicationVersion = GetValue(exchangeAttributes, "SourceApplicationVersion");
    }

    protected override Task<IEnumerable<IInputDescriptor>> GetInputFieldsCoreAsync(bool invalidation)
    {
        var descriptors = new List<IInputDescriptor>();

        if (this.contextApplied)
        {
            descriptors.Add(new AlertDescriptor("sourceInfo")
            {
                Message = $"Exchange created by {this.connectorName} {this.connectorVersion} " +
                          $"on {this.sourceApplicationName} {this.sourceApplicationVersion}"
            });

            // Show a Revit-specific option only when the exchange was Revit-authored
            if (this.connectorName.Contains("Revit", StringComparison.OrdinalIgnoreCase))
            {
                descriptors.Add(new CheckboxDescriptor("loadAtSurveyPoint")
                {
                    Title = "Load at Survey Point",
                    Value = false
                });
            }
        }

        return Task.FromResult<IEnumerable<IInputDescriptor>>(descriptors);
    }

    protected override Task<bool> HandleInputUpdatedCoreAsync(IInputDescriptor descriptor)
        => Task.FromResult(false);

    protected override Task<CustomInputContent> GetInputContentCoreAsync(string inputId)
        => Task.FromResult<CustomInputContent>(null);

    protected override Task HandleFormSubmissionCoreAsync(bool commit)
        => Task.CompletedTask;

    private static string GetValue(IReadOnlyDictionary<string, string> attrs, string key)
        => attrs.TryGetValue(key, out var v) ? v : string.Empty;
}
Available Exchange Attributes
exchangeAttributes contains the application-category attributes from the selected exchange. These always include the four SDK-managed metadata attributes set when an exchange is created, plus any custom attributes added via PlatformAttributes.
SDK-managed attributes (present on all exchanges created with this SDK):
| Key | Example Value |
|---|---|
ConnectorName |
Revit Connector |
ConnectorVersion |
2.1.0 |
SourceApplicationName |
Revit |
SourceApplicationVersion |
2025 |
Custom attributes are any key-value pairs your connector (or another connector) added via PlatformAttributes at exchange creation time. See Working with Platform Attributes.
Use TryGetValue rather than direct indexing when reading attributes. A missing key should produce a graceful default, not a KeyNotFoundException.
No Factory Changes Required
Your CustomFormFactory does not change. The bridge handles interface detection at runtime. Your factory continues to return ICustomForm:
public class CustomFormFactory : BaseCustomFormFactory
{
    protected override Task<ICustomForm> CreateCore(string formId)
    {
        switch (formId)
        {
            case CustomFormId.AdvancedCreateOptions:
                return Task.FromResult<ICustomForm>(new AdvancedCreateForm(formId));
            case CustomFormId.AdvancedLoadOptions:
                return Task.FromResult<ICustomForm>(new AdvancedLoadForm(formId));
            default:
                return Task.FromResult<ICustomForm>(null);
        }
    }
}
The bridge checks form is IExchangeContextForm after CreateAsync returns. If the form implements the interface, context is passed. If not, the form proceeds without context. No bridge configuration, no flags.
Validating Exchange Operations
Overview
Before the SDK runs a create, update, or load operation, it calls a set of validation hooks on your exchange model. Each hook is a virtual method you override to inspect the operation and decide whether it can proceed. This lets your connector enforce its own preconditions — for example, blocking exchange creation outside an approved project, or refusing to load an exchange it cannot service — without changing the SDK’s own workflow.
Overriding these hooks is opt-in. If you do not override a hook, it takes no action and the operation proceeds. This is the default behavior for every connector that uses the SDK’s built-in models.
Each hook receives a strongly-typed domain object that the SDK already holds at the point of validation. ExchangeItem describes an existing exchange, and ExchangeInput describes an exchange that is about to be created. You read the exchange, project, folder, and hub identifiers directly from typed properties, with compile-time safety and editor autocomplete.
The Validation Hooks
| Hook | Receives | Returns | Runs before |
|---|---|---|---|
ValidateCanCreateExchangeAsync |
ExchangeInput |
Task<IEnumerable<string>> |
Creating a new exchange |
ValidateCanUpdateExchangeAsync |
ExchangeItem |
Task<IEnumerable<string>> |
Updating an existing exchange |
ValidateGetLatestExchangeAsync |
ExchangeItem |
Task<bool> |
Loading the latest exchange |
ValidateGetLatestExchangeDetailsAsync |
ExchangeItem |
Task<bool> |
Fetching exchange details |
There are two return contracts:
- The create and update hooks return a collection of validation error messages. Return an empty collection to allow the operation. A non-empty collection is treated as a validation failure and the operation does not continue. The collection is never
null. - The two load hooks return a Boolean gate. Return
trueto allow the operation,falseto block it.
ValidateCanCreateExchangeAsync receives an ExchangeInput rather than an ExchangeItem because the exchange does not exist yet — there is no exchange identifier to validate against. ExchangeInput describes the target of the create: the hub, project, folder, and the title and description supplied for the new exchange.
Where the Hooks Live
The hooks are defined on the base exchange models. Override them on whichever base model your connector already derives from:
| Base model | Available hooks |
|---|---|
BaseReadWriteExchangeModel |
All four |
BaseReadOnlyExchangeModel |
ValidateGetLatestExchangeAsync, ValidateGetLatestExchangeDetailsAsync |
BaseWriteOnlyExchangeModel |
ValidateCanCreateExchangeAsync, ValidateCanUpdateExchangeAsync |
Use Case: Enforce Connector Preconditions
Suppose your connector should create and update exchanges only in an approved set of hubs, always requires a target folder before a create, and should load exchanges only from those same approved hubs. The following model derives from BaseReadWriteExchangeModel and overrides all four hooks to enforce those rules. Copy it into your connector and adjust the approved-hub list and the checks to match your policy.
using System.Collections.Generic;
using System.Threading.Tasks;
using Autodesk.DataExchange.BaseModels;
using Autodesk.DataExchange.Core;            // ExchangeItem
using Autodesk.DataExchange.Core.Models;     // ExchangeInput

public class MyExchangeModel : BaseReadWriteExchangeModel
{
    private static readonly HashSet<string> ApprovedHubs = new HashSet<string>
    {
        "b.1a2b3c4d-0000-0000-0000-000000000000",
    };

    // Create: return validation errors. An empty collection allows the operation.
    public override Task<IEnumerable<string>> ValidateCanCreateExchangeAsync(ExchangeInput exchangeInput)
    {
        var errors = new List<string>();

        if (!ApprovedHubs.Contains(exchangeInput.HubId))
        {
            errors.Add("Exchanges can only be created in an approved hub.");
        }

        if (string.IsNullOrEmpty(exchangeInput.FolderID))
        {
            errors.Add("Select a target folder before creating the exchange.");
        }

        return Task.FromResult<IEnumerable<string>>(errors);
    }

    // Update: same error-collection contract as create.
    public override Task<IEnumerable<string>> ValidateCanUpdateExchangeAsync(ExchangeItem exchangeItem)
    {
        var errors = new List<string>();

        if (!ApprovedHubs.Contains(exchangeItem.HubId))
        {
            errors.Add("This exchange is not in an approved hub and cannot be updated.");
        }

        return Task.FromResult<IEnumerable<string>>(errors);
    }

    // Load: return true to allow, false to block.
    public override Task<bool> ValidateGetLatestExchangeAsync(ExchangeItem exchangeItem)
    {
        var canLoad = ApprovedHubs.Contains(exchangeItem.HubId);
        return Task.FromResult(canLoad);
    }

    // Details: gate the same way as load.
    public override Task<bool> ValidateGetLatestExchangeDetailsAsync(ExchangeItem exchangeItem)
    {
        var canLoad = ApprovedHubs.Contains(exchangeItem.HubId);
        return Task.FromResult(canLoad);
    }
}
Best Practices
- Return an empty collection, not
null, from the create and update hooks when validation passes.nullis not a valid success signal. - Return a descriptive message for each validation failure so the reason the operation was blocked is captured clearly.
- Keep validation fast and free of side effects. These hooks run in the operation’s critical path, so avoid long-running work and do not mutate connector state from them.
- Read only the properties you need from
ExchangeItemandExchangeInput, and handle empty or missing values gracefully. Not every property is populated for every operation.
Troubleshooting: SetDocumentName Has No Effect
var bridge = InteropBridgeFactory.Create(bridgeOptions);
bridge.ClientStateChanged += (s, e) =>
{
    if (e.IsConnected)
    {
        var documentTitle = this.GetDocumentNameYourWay();
        bridge.SetDocumentName(documentTitle ?? string.Empty);
    }
};

await bridge.InitializeAsync();
await bridge.LaunchProcessAsync();
Note: Subscribe to
ClientStateChangedright after creating the bridge. This ensures document name is set once the UI is ready.